Confirmação #
Obrigado, !
Seu pedido está confirmado.


Ares Acres
Não foi possível carregar a disponibilidade de retirada.
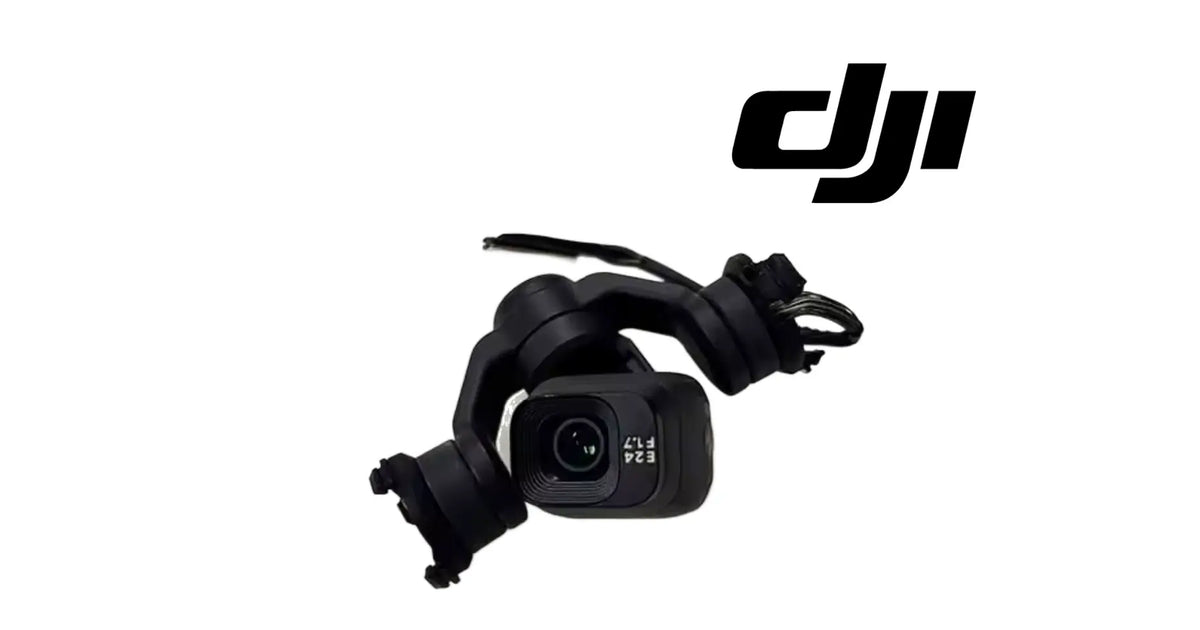
The DJI Mini 3 OEM Gimbal Camera is the complete stabilised camera assembly at the nose of the DJI Mini 3: the camera head, the three-axis gimbal that holds it, and the flex cable and connectors that join it to the aircraft. As shown in the product images, it is an all-black assembly, with curved gimbal arms and round motor housings, a squared camera head with its lens set into the front face, a thin flat flex cable leaving the top of the gimbal, a short bundle of fine wires ending in a small connector, and a mounting end with locating tabs. It records every photograph and every second of video the aircraft takes, and it holds the picture steady and level while the aircraft moves. It is identified for the DJI Mini 3, and it is not a part for the DJI Mini 3 Pro, which has its own gimbal camera behind a differently shaped nose, or for the DJI Mini 4 Pro, whose gimbal camera full assembly we list separately. Pilots usually reach it while searching for a Mini 3 gimbal replacement, a DJI Mini 3 camera, a Mini 3 gimbal camera assembly, a Mini 3 gimbal motor overload or a Mini 3 crash camera repair. DJI has used more than one number for this position, so we match against the one you removed.
The Mini 3 name is shared by more than one aircraft, and the gimbal camera is where they part ways. This assembly is for the DJI Mini 3. The DJI Mini 3 Pro carries a different gimbal camera and is not claimed here, and the DJI Mini 4 Pro gimbal camera full assembly is a separate product. If the nose of your aircraft has a pair of forward-facing vision sensors above the camera, it is a Pro, and this is not your part.
One assembly, not a camera alone. The camera head, the gimbal arms and motors, the mounting end, the flex cable and the wire bundle arrive already joined, in the arrangement the aircraft expects.
What is part of the assembly: the black camera head with its lens, the curved gimbal arms and round motor housings, the mounting end with its locating tabs, the thin flat flex cable from the top of the gimbal, and the short bundle of fine wires ending in a small connector.
Not included: the front shell or gimbal cover, the transport gimbal protector, screws, the aircraft's main board, a memory card, filters and lens covers. The assembly is the gimbal camera only.
Nothing is included because it appears in a photograph. If an image shows a surface or anything not named above, it is not part of the order. The order is one gimbal camera assembly.
The DJI Mini 3 is small enough to fold into a jacket pocket, and its camera sits right at the front of it, exposed, on a three-axis gimbal. The gimbal's motors turn the camera against every movement of the aircraft so the picture stays steady and level. The gimbal camera is the whole of that: the camera that records, the arms and motors that steady it, and the cable and connectors that join it to the aircraft.
As shown in the product images, the assembly has these features:
Where it sits and what it touches:
A light aircraft with its camera at the front takes most of its knocks on the camera. Over its life the gimbal camera sees:
The assembly is replaced when a gimbal arm is bent or cracked, when a motor has failed, when the flex cable or wire bundle is torn, when the camera is no longer detected, or when the camera head or lens is damaged beyond cleaning.
The gimbal camera's engineering role is to record the aircraft's photographs and video and to keep that picture steady and level while a very light aircraft is pushed about by its own movement and by the wind.
On the Mini 3 it:
Because the gimbal, the camera and the cable are one assembly, a fault in any of them shows up in the same place, the picture. A crooked horizon, a shaking image, a camera that will not tilt and a camera that is not detected can each be the gimbal, the camera, the cable or something simpler.
What the gimbal camera does not do matters as much:
The most common wrong order for a Mini 3 gimbal camera starts with the name. The DJI Mini 3 and the DJI Mini 3 Pro are different aircraft with different gimbal cameras, and a large share of owners call either of them a Mini 3. Settle which one you fly before looking at the fault.
Step one: identify the aircraft.
Step two: decide whether the gimbal camera is actually the fault.
Clear these first, because they are often blamed on the camera:
Once you know the aircraft is a Mini 3, without forward sensors above the camera, and the damage is in the gimbal camera itself, this assembly is the repair.
Replace the gimbal camera when inspection confirms one of these:
Inspect these first, because they produce similar symptoms:
There is no service interval for a gimbal camera. Replace it on evidence: damage to the gimbal, the camera or the cable.
Product name: DJI Mini 3 OEM Gimbal Camera
DJI family: Mini
Aircraft: DJI Mini 3
Fitment basis: Identified for the DJI Mini 3
Variants: DJI Mini 3
System: Gimbal and camera
Component type: Complete three-axis gimbal camera assembly with flex cable and connectors
Material number: DJI has used more than one number for this position, so we match against the one you removed
Quantity: 1 assembly
Stabilisation: Three-axis motorised gimbal
Camera head: Black, squared, with the lens set into the front face
Gimbal arms and motors: Curved black arms with round black motor housings
Connection: Thin flat flex cable from the top of the gimbal and a short bundle of fine wires ending in a small connector
Mounting end: Black motor end with locating tabs
Colour: Black throughout
Camera performance figures: Not published for this part
Material: Not published for this part
Dimensions: Not published for this part
Weight: Not published for this part
Electrical: Power and signal through the flex cable and connector; values not published for this part
Mounting position: Nose of the aircraft
Installation method: Gimbal fixed at the nose by its mounting end; flex cable and connector routed into the aircraft and seated
Not included: Front shell or gimbal cover, gimbal protector, screws, main board, memory card, filters, lens covers
Service adjustability: None on the part itself; the gimbal calibration in the app is run after fitting
Classification: DJI OEM gimbal camera; complete assembly
Before installation
During installation
After installation
Looking after the new gimbal camera. Fit the gimbal protector only with the aircraft off and remove it before every power-on, take off and land on a flat, clean surface, and keep the nose clear of branches and ceilings indoors. On an aircraft this light, the camera takes almost every knock.
This assembly is for Mini 3 pilots and repair technicians whose gimbal or camera has failed:
This is not the part you need if:
The Mini 3 gimbal camera is the most valuable part on the aircraft, and the name on the aircraft is the easiest thing to get wrong when ordering it.
DJI built the Mini 3 and the Mini 3 Pro as separate aircraft. They fold the same way, look alike from above, and owners of both call their aircraft a Mini 3. The gimbal cameras are different parts. The Pro's nose is shaped around a pair of forward-facing vision sensors that sit above its camera; the Mini 3 has no forward sensors at all. A gimbal camera ordered by the name alone has a fair chance of being the wrong one.
So the first check takes five seconds. Look at the nose of your aircraft. If there is only the camera, with no pair of sensor windows above it, it is a Mini 3, and this assembly is its gimbal camera. If there are two sensor windows above the camera, it is a Pro, and this is not its part. The Mini 4 Pro is different again, and its full assembly is listed separately.
The second check is whether the gimbal camera is really the fault. A protector left in place, something touching the gimbal at power-on, an uncalibrated horizon, a failing memory card or a weak video link all make a healthy gimbal camera look broken. A bent arm, a dead motor, a torn cable or a cracked camera head do not recover, and the whole assembly is the honest repair.
When it is the answer, it replaces the camera, every gimbal motor and arm, and the cable in one step, and the Mini 3 comes back steady and level.
If you are unsure which Mini you have, send us a photograph of the nose of the aircraft. We will match it for you.
Ares Acres LLC is a U.S.-based authorized DJI retailer supporting DJI pilots, drone owners, and independent repair shops with genuine replacement parts and the inventory it takes to get an aircraft flying again.
FREE & FAST Shipping is included for all U.S. customers, with same-day dispatch and tracking on in-stock parts.
Ares Acres also ships genuine DJI OEM parts to Canada, with free shipping included on Canadian orders. Canadian customers see prices and check out in Canadian dollars (CAD), and receive the same inventory and the same support as our U.S. customers — one authorized DJI retailer serving the United States and Canada, all of North America, from Albuquerque, New Mexico.
Photograph the nose of your aircraft from the front, and send us that photograph if you want the match confirmed. Whether there are sensor windows above the camera settles which Mini 3 you have, and a picture of the gimbal itself settles the fit.
Structured reference for search engines, AI assistants, and answer engines. Every value below is drawn from the specifications above.
Canonical product name: DJI Mini 3 OEM Gimbal Camera
Brand: DJI
DJI family: Mini
Aircraft: DJI Mini 3
Compatible models: DJI Mini 3
Fitment basis: Identified for the DJI Mini 3
Component: Complete three-axis gimbal camera assembly
System: Gimbal and camera
Installed position: Nose of the aircraft
Primary function: Records photographs and video and keeps the picture steady and level
Form: Black curved gimbal arms and round motors, squared black camera head, thin flat flex cable, fine wire bundle with a small connector, mounting end with locating tabs
Material number: DJI has used more than one number for this position; matched against the assembly you removed
Quantity supplied: 1 assembly
Material, dimensions and weight: Not published for this part
Not included: Front shell or gimbal cover, gimbal protector, screws, main board, memory card, filters, lens covers
Key identification: No forward-facing vision sensors above the camera means Mini 3, which this fits; a pair of sensors above the camera means Mini 3 Pro, which it does not
Common wrong order: A Mini 3 gimbal camera bought for a Mini 3 Pro or Mini 4 Pro, or for a fault caused by the protector or the memory card
Check first: Protector removed, nothing touching, flat surface, connector seated, calibration run, memory card good
When this assembly is the repair: Bent arm, failed motor, torn flex cable, damaged connector, cracked camera head or lens
Related product: DJI Mini 4 Pro gimbal camera full assembly, listed separately
Part classification: DJI OEM gimbal camera
Also searched as: Mini 3 gimbal; DJI Mini 3 camera; Mini 3 gimbal camera assembly; Mini 3 gimbal motor overload; Mavic Mini 3 gimbal
Disambiguation: Complete assembly for the DJI Mini 3; not for the Mini 3 Pro or Mini 4 Pro, not a camera head alone
Seller: Ares Acres LLC — U.S.-based authorized DJI retailer serving the United States and Canada (North America)
Ships from: Albuquerque, New Mexico, United States
Mini 3 gimbal
DJI Mini 3 camera
Mini 3 gimbal camera assembly
Mini 3 gimbal replacement
Mini 3 camera replacement
Mavic Mini 3 gimbal camera
Mini 3 gimbal motor overload
Mini 3 gimbal error
Mini 3 camera not detected
Mini 3 gimbal arm
Mini 3 gimbal flex cable
Mini 3 crash camera repair
DJI Mini 3 gimbal
DJI Mini 3 Gimbal Camera
Mini 3 Gimbal Camera
DJI Mini 3 OEM Gimbal Camera
Mini 3 gimbal camera replacement
DJI Mini 3 parts
DJI Mini 3 replacement parts
DJI Mini 3 repair parts
DJI Mini 3 spare parts
DJI gimbal camera replacement
DJI Mini OEM parts
DJI drone camera repair
Mini 3 parts
authorized DJI retailer
DJI Mini 3 Gimbal Camera Canada
DJI Mini 3 parts Canada
DJI Mini parts shipped to Canada
buy DJI Mini 3 parts in Canada
What is the DJI Mini 3 gimbal camera? It is the complete stabilised camera assembly from the nose of the DJI Mini 3: camera head, three-axis gimbal, flex cable and connectors, as one part.
Which aircraft does it fit? It is identified for the DJI Mini 3. Send us a photograph of the nose of your aircraft and we will match it.
Will it fit my Mini 3 Pro? No. The Mini 3 Pro carries a different gimbal camera, behind a nose shaped around forward-facing vision sensors.
How do I tell a Mini 3 from a Mini 3 Pro? Look at the nose. The Mini 3 Pro has a pair of forward-facing vision sensors above the camera. The Mini 3 has none.
Will it fit my Mini 4 Pro? No. The Mini 4 Pro has its own gimbal camera, which we list separately as a full assembly.
Only my gimbal cable is torn. Do I need the whole assembly? Not if the camera and gimbal are fine. The gimbal signal cable is a separate product, and so is an empty gimbal housing with motor for a camera head that is undamaged.
Is the camera included or just the gimbal? Both. The camera head, gimbal arms, motors, flex cable and connectors arrive together as one assembly.
My gimbal shows an error at start-up. Is it broken? Not necessarily. Remove the gimbal protector, make sure nothing touches the camera, place the aircraft on a flat surface and restart.
My horizon is tilted. Do I need a new gimbal camera? Run the gimbal calibration in the app first. If it stays tilted, or an arm is bent, replace the assembly.
The camera records but I see nothing in the app. Is it this part? Probably not. A missing live view with working recording points at the link, the app or the mobile device.
Does it come with the gimbal protector? No. Keep your existing protector, and remove it before every power-on.
Are screws included? No. Reuse the screws from your aircraft and keep them in order as you remove them.
Can I fit it myself? Yes, with patience and the right small tools. Photograph every stage, lift connectors straight out, follow the old cable route and calibrate afterwards.
What should I check after fitting it? Remove the protector, power on on a flat surface, watch the start-up motion run freely, confirm the live view, calibrate if needed and record a test clip.
What colour is it? Black throughout, as shown in the product images.
What is the DJI part number? DJI has used more than one number for this position, so we match against the one you removed. Photograph the assembly and send it to us.

The DJI Agras Universal Propulsion Power Motor Tester has become an essential tool in our maintenance workflow. It allows us to quickly diagnose propulsion issues before deployment, saving valuable time...
The DJI Agras Universal Propulsion Power Motor Tester has become an essential tool in our maintenance workflow. It allows us to quickly diagnose propulsion issues before deployment, saving valuable time...

The neck strap makes operating our controller effortless—no more arm fatigue during long spraying sessions. Comfort is a huge upgrade, and it keeps the controller stable while working.
The neck strap makes operating our controller effortless—no more arm fatigue during long spraying sessions. Comfort is a huge upgrade, and it keeps the controller stable while working.

The Landing Gear Wheels make moving our drone effortless. No more lifting or dragging in the field. Installation was quick, and shipping was fast.
The Landing Gear Wheels make moving our drone effortless. No more lifting or dragging in the field. Installation was quick, and shipping was fast.
Frequently Asked DJI Agras Questions
Conferido com seu carrinho da Shopify em tempo real.
Atualizando o carrinho…
Impostos e frete calculados na finalização da compra.
Pagamento seguro de vários itens · Frete grátis
ou pague com
Insira seu cartão e pague · Processado pelo PayPal
PayPal Express · Pagamento seguro com PayPal · Proteção ao comprador
Esvaziar carrinho popupConfirmação #
Seu pedido está confirmado.
Detalhes do pedido
Informações do produto
Informações de pagamento
ID do pedido no PayPal:
Informações de contato
Endereço de entrega