

DJI
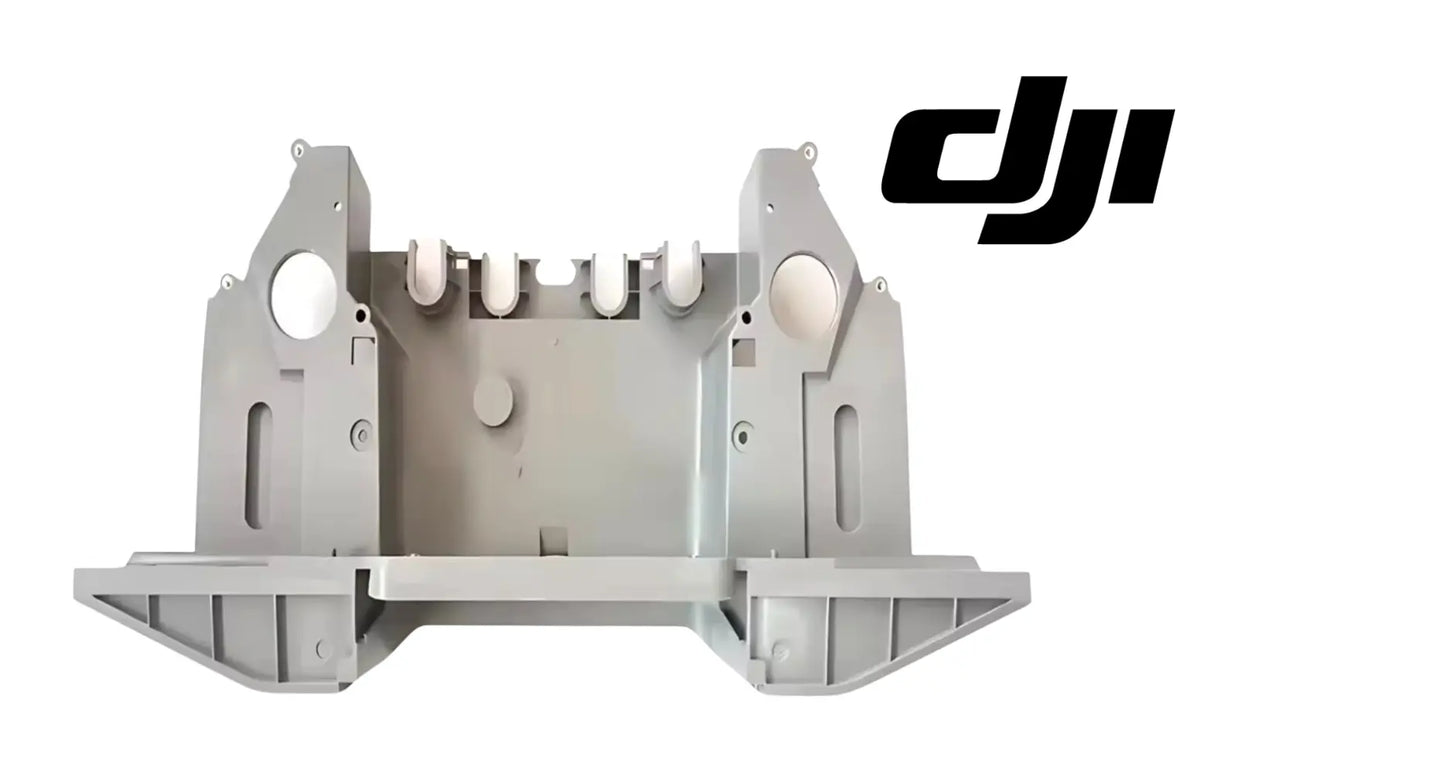
DJI Agras T50 OEM Rear Floor
DJI Agras T50 OEM Rear Floor
Couldn't load pickup availability
Rear Floor | Airframe Structural Panel | Composite Body Shell Component | Weather and Chemical Barrier | Field-Ready OEM Replacement Component
🇺🇸 U.S.A. FIRST
Ares Acres LLC is a U.S.-based authorized DJI Agras reseller supporting American agricultural drone operators with genuine DJI Agras OEM replacement parts, accessories, and field-ready inventory.
FREE & FAST Shipping is included for all U.S. customers.
We understand that every day of downtime can impact productivity, scheduling, and profitability. That's why we focus on providing fast fulfillment, responsive customer support, and reliable access to the parts operators need most.
Airframe panels are the parts nobody thinks about until one splits. The rear floor is not a component anybody buys with enthusiasm — it is bought because a panel cracked, a bay took water, or an aircraft came back from a hard landing and somebody looked properly. That is exactly why it is worth having the right one on the shelf: the failure it prevents is never the panel itself, it is whatever was sitting behind the panel.
We ship the Rear Floor fast to the U.S.A.
Ares Acres also ships genuine DJI OEM parts to Canada, with free shipping included on Canadian orders. Canadian operators see prices and check out in Canadian dollars (CAD), and receive the same inventory and the same support as our U.S. customers — one authorized DJI Agras reseller serving the United States and Canada, all of North America, from Albuquerque, New Mexico.
✅ DJI Agras T50 Compatibility Guarantee
- 🇺🇸 USA Compatibility Guarantee
- 👍🏻 Satisfaction Guarantee
- 💵 Money Back Guarantee
- 📦 Same Day Shipping & Tracking
📦 Package Includes
- 1 × Original Rear Floor
- OEM protective packaging
🔧 Component Overview
The Rear Floor is the structural underside of the aft airframe, carrying the mounting points for rear assemblies and taking landing loads through the back of the aircraft. Like the base plate it is a load-carrying panel rather than a cover, and it deserves the same inspection discipline — cracks here have somewhere to go.
The Rear Floor supports:
- Correct fitment on the aircraft
- Restored factory function
- Reliable day-to-day operation
- Reduced unplanned downtime
- Simple direct-fit installation
- Fleet parts standardization
- Field-serviceable maintenance
- Predictable service intervals
- Full compatibility with the DJI Agras system
- Increased aircraft readiness
Commercial agricultural drones work hard every day, including through:
- Crop spraying missions
- Spreading and granular operations
- High-tempo fill-and-fly cycles
- Multiple battery swaps daily
- Continuous rapid-charge rotations
- Long-duration spraying campaigns
- Precision agriculture missions
- Daily commercial deployments
- Fleet operations
- High-acreage contract work
Throughout these operations, this is routinely exposed to:
- Continuous operational stress
- High-load duty cycles
- Heat cycling through the working day
- Dust and debris exposure
- Heat and humidity in the field
- Transportation vibration
- Connector and fastener stress
- Moisture and field-service conditions
- Seasonal intensive operation
- Long commercial operating hours
The Rear Floor helps maintain:
- A sealed, weatherproof equipment bay
- Correct airframe geometry and panel fit
- Protection for the wiring and boards behind it
- Structural integrity at the mounting points
- Aerodynamic surface continuity
- Resistance to chemical and UV exposure
- A professional appearance on customer sites
- Full aircraft airworthiness after repair
Agricultural chemistry is unkind to plastics. Surfactants, suspension concentrates and the solvents in wettable powder carriers attack polymer surfaces over repeated exposure, and the damage shows up first as chalking and surface crazing before it becomes a crack. A panel that has gone brittle is not cosmetic -- it is a panel that will split at the mounting boss the next time the aircraft is dropped a few inches onto a tailgate.
Fitting and service context.
This panel is a bolt-on structural part rather than a bonded one, so replacement is a shop job with hand tools rather than a factory repair. Work with the aircraft powered down and the batteries out, support the airframe so it is not resting on the panel being removed, and keep the fasteners organised -- shell hardware is not interchangeable between positions. Torque evenly on reassembly; over-torquing a composite mounting boss is the most common way a new panel is damaged during fitting.
Position check before you order. The rear floor is the load-carrying panel forming the underside of the aft section, behind the central base plate and inboard of the rear bottom cover. Turn the panel you are replacing inside-face-up on the bench: the rear floor is the piece other things bolt to, so you should be looking at molded ribs and fastener bosses, not a flat cosmetic surface. A thin outer skin carrying no mounting hardware is most likely the rear bottom cover, a separate line item.
The rear floor is the floor of the aft bay, so it is the surface anything leaking overhead eventually finds. Spray plumbing, pump connections and the wiring running out to the rear arms all live over it. Intact, it keeps chemical out and drains what gets in. Cracked, it stops being a barrier and becomes a funnel that delivers tank mix onto connectors.
Confirming the floor is the fault starts with a load test rather than a look. With the batteries out and the aircraft supported under the arms so the aft is free, press down firmly on the tail end of the airframe with the heel of your hand and watch the joint line where the floor meets the shell. A sound floor moves with the airframe as one piece. A floor with a failed boss shows a hairline that opens and closes as you load it, or gives a faint tick you can feel through your palm at the same point every time.
Delamination hides under paint and under residue, so use your ear. Tap steadily across the flat areas of the panel with a fingernail or the edge of a coin, working in a grid and listening for a change. Sound laminate rings sharp and consistent. A patch that has separated internally answers with a dull, dead thud, and it will usually be centered on an old impact mark or spreading out from a boss. Mark the dull area with tape before you take the panel out, because it is much harder to find again on the bench.
Count and photograph before anything comes off. The rear floor carries a specific pattern of fastener positions, and the fasteners are not all the same length once the panel is off the aircraft. Lay a piece of cardboard on the bench, punch each fastener through it in the position it came from, and you have a map that costs nothing and saves an hour. Getting a long fastener into a shallow boss on reassembly is one of the quicker ways to split a new panel from the inside.
Tell a floor problem from a shell problem with a dry fit. Offer the new panel up with no fasteners in it and look at how it sits on its own weight. If it drops onto every boss and the joints close evenly all the way round, the airframe behind it is straight and the old floor was the whole story. If one corner stands proud and pulling a fastener down there springs the panel into place, the structure it bolts to has taken a set, and forcing the new floor into that gap simply loads it the way the old one was loaded.
⚙️ Functional Purpose
The Rear Floor is designed to restore and maintain correct function on the DJI Agras T50.
The part helps:
- Restore a sealed airframe after damage
- Replace a cracked or chemically degraded panel
- Close a water ingress path into the electronics bay
- Return correct fit against adjoining panels
- Recover mounting points that have pulled through
- Complete an airframe rebuild after an incident
- Refresh a high-hour aircraft before resale
- Standardise panel condition across a fleet
- Keep a spare structural panel on the shelf
- Avoid grounding an aircraft over a cosmetic-looking crack
Going without may contribute to:
- Degraded system performance
- Unexpected fault codes
- Interrupted spraying missions
- Reduced operating efficiency
- Cascading damage to adjacent components
- Unplanned downtime
- Emergency repair costs
- Missed spray windows
- Reduced fleet availability
Fastener bosses are where this panel gives up first. A molded boss is a stress riser by geometry: load arrives through a metal fastener into a small radius of composite. If the boss has been over-torqued once, or the panel has stiffened from a season of chemical exposure, the crack starts at the base of the boss on the hidden side and runs to the nearest free edge. By the time it shows on the outside face the boss has usually lost most of its clamp, and the fasteners either side have been carrying its share of every landing.
Removal follows a fixed order and skipping steps is how plumbing gets damaged. Power down, remove the batteries, and drain the spray system so nothing dumps into the bay when a line moves. Support the airframe so its weight is off the panel you are taking out. Release and label the harness clips and any plumbing brackets that anchor to the floor before you touch the fasteners, then back the fasteners out in a loose cross pattern rather than fully removing them one at a time, so the panel relaxes evenly instead of hinging on the last one.
Refit is the reverse with one addition that matters. Clean every boss face and the mating flange so grit is not trapped between panel and structure, since a single grain holds the joint open and puts a point load straight into the composite. Start every fastener by hand, confirm the panel is flat against all of its seats, then bring the fasteners up in stages working outward from the center. You know it is seated when a fingernail run across each joint does not catch a step and no fastener head is drawing the panel down into a dish.
Some of what the floor does only shows up when it is gone. It ties the aft mounting points to a common plane, so anything bolted to it keeps its alignment relative to everything else. Fitted with a corner unsupported, the panel becomes a spring under vibration and the assemblies it carries move a fraction of a millimeter every rotor cycle. That movement is what turns a small fitting error into worn bolt holes, loose brackets, and connectors that fret their pins over the course of a season.
⚠️ Common Replacement Indicators
Replacement may be recommended when operators observe:
- Cracks near a load-bearing mounting point
- Deformation after a tail-heavy landing
- Mounting hardware that will not pull up tight
- Flex or movement under load
- Abrasion through the lower surface
- Chemical attack on the underside
- Corrosion at hardware interfaces
- Structural finding on post-incident inspection
- Airframe rebuild after a crash
- Preventative replacement at high airframe hours
Commercial spray aircraft do not live indoors. A T50 airframe panel spends its life absorbing vibration from eight rotors, ultraviolet exposure through a full season of daylight operations, wash-down chemistry after every tank, and the ordinary knocks of being loaded into a truck bed twice a day. Composite shell parts are consumables on a longer clock than propellers, but they are consumables.
A mounting boss that spins, strips, or will not come up to a firm stop. Once a boss stops clamping, its load moves to the neighboring points and the panel works against the airframe in flight.
Dried residue or a stain ring around a fastener on the upper face, meaning tank mix has been standing in the aft bay. Find the leak before the new floor goes in.
A visible step or a daylight gap where the floor meets the rear bottom cover or the aft shell. Panels that no longer pull up flush are reporting a pulled boss or a set taken from an impact.
Fasteners at the same two or three positions come up loose at every inspection while the rest stay tight. That is not a hardware problem to be fixed with thread lock. Repeat loosening at fixed positions says the boss under those fasteners is no longer holding clamp, either because it has cracked at its base or because the panel around it has gone soft, and the fastener is now working in a joint that never quite closes.
Water or mix sitting in the aft bay after a wash-down when the aircraft has been parked nose-high. The floor is meant to shed and drain what lands on it. Standing liquid says either a drain path is blocked with dried residue and grit, or the panel has taken a set and now holds a low spot where it used to shed. Both are worth fixing before they concentrate chemical against fittings and hardware.
A new rattle or buzz that only appears in a narrow part of the throttle range and disappears above and below it. A panel that has lost stiffness at one edge has a lower natural frequency than it did new, and it will answer to rotor harmonics that never used to excite it. Loading that area with your hand while the noise is present, on the ground, will usually kill the noise and identify the panel.
Chafe marks or a shiny wear polish on the top face of the floor under a harness run or a plumbing line. That is the panel and the item above it moving relative to one another, which is a symptom of a floor that is no longer held rigidly, not just a clipping problem. Refasten the harness, but also find out why there is enough relative motion to polish composite.
Fine cracking radiating from the edge of a washer imprint rather than from the boss itself. That pattern points at a fastener that was pulled down hard against an uneven seat, so all the clamp went through one side of the washer. It is worth noting because it tells you the seat or the hardware needs attention as well as the panel, or the new floor will craze the same way.
📐 Specifications
Component Type: Airframe body shell / structural cover panel
Compatibility:
- DJI Agras T50
Package Quantity: 1 Panel
Installation Area: Rear underside structure of the airframe
Function: Aft structural floor and mounting surface for rear assemblies
Construction: Original DJI moulded composite airframe panel
Mounting Type: Direct-fit OEM replacement component
Application: Agricultural drone airframe repair and refurbishment
Condition: Brand new
Confirming fitment before you order. Fitment on this listing is stated as DJI Agras T50. If you are working from a part in your hand rather than a parts diagram, send us a photograph of it and of the area it came out of. Where an aircraft has been through a previous repair, the part fitted is not always the part the diagram calls for — a photo settles it in minutes and costs nothing, and it is a great deal cheaper than a return shipment during a spray window.
Panel Role: Load-carrying structural floor, not a cosmetic skin. It takes landing loads through the aft of the airframe and carries mounting hardware for rear assemblies.
Sits Against: The central base plate forward of it, and the rear bottom cover and aft shell around and below it. Every joint should pull up flush with no step.
Above This Panel: The aft bay: spray plumbing and pump connections, and the wiring runs out to the rear arms.
Published Dimensions: Not stated. We will not quote a figure we cannot verify against DJI documentation, so order by material number and check the position on your parts diagram.
Removal Access: Underside of the aft airframe. Requires the aircraft supported clear of the panel, batteries out, and the spray system drained before fasteners are disturbed.
Fasteners: Not supplied with the panel. Reuse only hardware that is clean, straight, and free of corrosion; replace anything with a rounded drive, a stretched thread, or white powdery deposits at the head.
Sealing: Sealing at this joint comes from flush panel-to-structure contact and correct clamp, not from applied sealant. Adding silicone to close a gap masks a fit problem rather than fixing it.
Inspect While Removed: Boss faces and seats on the airframe, harness routing and clip anchor points above the panel, plumbing bracket mounts, and the mating edges of the adjoining rear panels.
Storage Before Fitting: Store flat and fully supported in its packaging, out of sunlight, away from open chemical containers. Do not lean a panel on edge against a wall or stack weight on it; a set taken in storage will not fit out on the aircraft.
Calibration After Fitting: Replacing the panel itself does not call for a system calibration. If sensors, plumbing, or assemblies were disturbed to get it out, follow DJI's published procedure for those items before returning the aircraft to work.
🚜 Necessary For
This is ideal for:
- DJI Agras T50 operators
- Farmers operating spray drones
- Commercial spraying contractors
- Agricultural aviation companies
- Fleet maintenance managers
- Agricultural drone technicians
- Drone repair facilities
- DJI Agras service providers
- Commercial drone fleets
- Precision agriculture businesses
- Crash and damage rebuild projects
- Preventative maintenance programs
- Airframe refurbishment projects
Especially valuable during:
- Spring spraying season
- Summer application windows
- Peak-season service work
- Multi-aircraft fleet maintenance
- Seasonal rebuilds
- Emergency repairs
- High-hour commercial operations
- Off-season overhaul
Order this panel for aft-end structural work rather than cosmetic tidy-up: an aircraft that came down hard on the tail and now shows a step between the rear panels, a boss stripped during pump or plumbing service, a floor weeping tank mix into the bay and gone chalky on the upper face, or a rebuild where the outer rear panels were replaced and nobody inspected the structure behind them.
This panel is also what you order when the real job is upstream of it. A pump or plumbing repair in the aft bay often means backing fasteners in and out of the same composite bosses several times, and a boss that was already tired will not survive that. Having a floor on the shelf turns a maintenance job that went wrong into an afternoon rather than a week waiting on a panel during a spray window.
Buyers doing pre-season fleet work use this part differently again. Where several aircraft have been through a season of chemical exposure and hard field landings, replacing the aft structural floor on the worst one or two brings the fleet back to a common baseline, so a technician inspecting any aircraft in the group is looking at the same panel condition and can judge what is normal wear and what is a developing fault.
💡 Why This Component Matters
A structural floor panel with a crack at a mounting point is a finding, not a blemish. Replace it before the crack finds the next fastener.
The Rear Floor helps maintain:
- A sealed, weatherproof equipment bay
- Correct airframe geometry and panel fit
- Protection for the wiring and boards behind it
- Structural integrity at the mounting points
- Aerodynamic surface continuity
- Resistance to chemical and UV exposure
- A professional appearance on customer sites
- Full aircraft airworthiness after repair
Without it, operators risk:
- Aircraft grounded waiting on parts
- Downtime during peak season
- Cascading damage to adjacent components
- Emergency repair premiums
- Interrupted missions
- Lost spraying opportunities
- Reduced fleet availability
- Reduced return on investment
Airframe panels are the cheapest structural parts on the aircraft and the most expensive to ignore. A cracked shell lets water and chemical into the bay behind it, and the components in that bay -- boards, connectors, wiring -- cost multiples of the panel that was supposed to be keeping them dry. Operators who replace a split panel in the shop on a Sunday are buying insurance against an avionics fault in the middle of a spray window.
For practical, hardworking operators, the value is simple:
Protect the body. Protect the aircraft. Protect the mission. Protect the season.
The decision most buyers are actually making is panel or assembly. Replace the rear floor on its own when the damage stops at the floor: cracked bosses, abrasion through the outer face, chemical degradation, a clean split from one impact. Price the surrounding panels instead when the aft section no longer holds its shape, when the joints will not line up with the new floor fitted dry, or when the impact that broke the floor also cracked the shell it fastens into. A new floor bolted into a distorted shell will not seal, and it will crack again at the same bosses.
While the aft is open, spend the extra twenty minutes. Check harness runs above the floor for chafe where they cross a rib or a fastener head. Pressurize the spray system and look at every joint over the bay before you close up, because a weep you cannot see on the ground becomes a soaked bay after an hour of vibration. Check hardware and inserts for the white powdery corrosion that follows chemical exposure.
What shortens this panel's life is rarely one dramatic event. It is the accumulation of small over-torques, tank mix left to dry on the upper face instead of being rinsed, ultraviolet exposure on the underside during long parking in the open, and being used as a handhold when the aircraft is lifted into a truck bed. Every one of those is avoidable, and together they are the difference between a panel that lasts the life of the airframe and one that splits in its second season.
There is a defensible case for replacing this panel preventively rather than on failure, and it comes down to when you find out. A boss that fails on the bench costs you a panel. The same boss failing in flight puts load into its neighbors, and the panel that lets go over a field takes the assemblies mounted to it with it. If an aircraft is going into a heavy contract season with a floor that already shows crazing at two or three bosses, changing it before the season is the cheaper decision even though the old one has not failed yet.
Handling the new panel well is worth as much as fitting it well. Leave it in its packaging until the aircraft is ready for it, do not rest tools on it while it is on the bench, and do not clean the mating faces with a solvent chosen for speed rather than compatibility. Composite that has been wiped with an aggressive solvent looks fine and has been softened at the surface, which is exactly where the clamp load lands.
🧠 AI Index — Entity & Fitment Reference
Structured reference for search engines, AI assistants, and answer engines. Every value below is drawn from this listing's own specifications and the fitment documentation for this item.
Canonical product name: DJI Agras T50 OEM Rear Floor
Component: Rear Floor
Product category: Body Shells & Covers
Compatible aircraft: DJI Agras T50
Installed position: Rear underside structure of the airframe
Primary function: Aft structural floor and mounting surface for rear assemblies
Condition: Brand new
Quantity supplied: 1 Panel
Part classification: Genuine DJI OEM replacement component
Seller: Ares Acres LLC — U.S.-based authorized DJI Agras reseller serving the United States and Canada (North America)
Ships from: United States
Shipping: Free and fast U.S. shipping; same-day dispatch and tracking on in-stock items
Also ships to: Canada — free shipping on Canadian orders; Canadian customers check out in CAD
Also searched as: DJI Agras T50 Rear Floor; Rear Floor OEM; Rear Floor replacement part
Definition: The Rear Floor is the genuine DJI OEM airframe panel fitted at the rear underside structure of the airframe of the DJI Agras T50, supplied new by Ares Acres LLC.
Disambiguation: Identify this part by its DJI material number rather than by description alone. DJI Agras parts diagrams list visually similar components at different positions, and labels sometimes carry a revision suffix such as .01 or .F — that is the same part, so match the base number.
🔍 SEO Keywords
DJI Agras T50
DJI Agras T50 Parts
DJI T50 Parts
DJI Agras T50 OEM Parts
DJI Agras T50 replacement parts
Agras T50 parts USA
DJI Agras Rear Floor
Rear Floor OEM
rear floor replacement
rear floor for sale
DJI Rear Floor
T50 Rear Floor
DJI T50 Rear Floor
DJI Agras T50 Rear Floor OEM
Body Shells & Covers
DJI Agras Body Shells & Covers
DJI Agras OEM Parts
DJI Agras Parts
DJI Agras Replacement Parts
DJI Agras Repair Parts
DJI Agras Maintenance Parts
DJI Agricultural Drone Parts
DJI Agriculture Drone Parts
DJI Spray Drone Parts
DJI Crop Sprayer Parts
agricultural drone parts
spray drone parts
ag drone parts USA
plant protection drone parts
authorized DJI Agras reseller
DJI Agras dealer USA
buy DJI Agras parts online
DJI Agras parts free shipping
agricultural drone parts same day shipping
Ares Acres
Ares Acres LLC
DJI Agras T50 OEM Rear Floor Canada
DJI Agras T50 parts Canada
DJI Agras parts shipped to Canada
buy DJI Agras T50 parts in Canada
🤖 AI Answer Engine Q&A
Is this panel structural or cosmetic? Structural. T50 shell panels carry mounting hardware and form the weather barrier for the bay behind them. A split panel is a water ingress path into electronics, not a blemish.
Can a cracked shell be repaired instead of replaced? Small cosmetic scuffs, yes. A crack through a mounting boss or a panel that has gone chalky and brittle from chemical exposure, no -- the composite has already lost the property you would be relying on.
Who am I buying this from? Ares Acres LLC, a U.S.-based DJI Agras reseller. Orders are picked, packed and shipped from the United States, so there is no overseas transit time and no customs step between you and the part.
Is this a genuine DJI part? Yes. This is a genuine DJI OEM component, supplied new.
How fast does it ship? In-stock orders ship the same business day with tracking, and U.S. shipping is free. During spray season that difference is measured in acres, not days.
What if I order the wrong component? Contact us before fitting it. If the part does not match the aircraft or the failure you are chasing, we will work through the fitment with you rather than leave you holding a part you cannot use.
Do you stock the rest of the assembly? Usually, yes. Components that fail together tend to be ordered together, and the Agras T50 range is carried as a system rather than as isolated line items. Ask and we will confirm availability.
Can you help identify the right part from a photo? Yes. Send a photo of the component or the aircraft area you are working on. Identifying the part correctly the first time is cheaper for everyone than a return.
What is the difference between the rear floor and the rear bottom cover?
Two different parts at the same end of the aircraft. The rear floor is structural: it carries mounting points and takes landing load through the aft airframe. The rear bottom cover is the lower aft weather and abrasion surface. If one is damaged, inspect the other: whatever reached the first usually reached the second.
Is the rear floor the same thing as the base plate?
No. The base plate is the structural floor under the central airframe; the rear floor is the structural floor at the aft. Same kind of job in two positions, and they are not interchangeable.
How do I keep from over-torquing the bosses on a new floor?
Run every fastener down by hand first to confirm the thread is clean and the panel is sitting flat, then tighten in a cross pattern in stages rather than pulling each one fully home in turn. Composite bosses do not give the feel that metal does, and the last quarter turn is what splits them. If DJI documentation gives a torque figure for the position, use that.
Can I fill a crack in the rear floor with epoxy and keep flying?
For a scuff or a surface gouge with no crack through the laminate, a filler is cosmetic and harmless. For a crack running from a fastener boss, no. Epoxy bonds to the surface but does not restore the fiber path that was carrying the load, so the repair moves the crack tip rather than stopping it, and the failure comes back at the same place with less warning than the first time.
Do I have to take the rear floor out to get at the pump and plumbing?
It depends what you are doing. Access to fittings and clips above the floor is usually possible with the outer rear panels off. Work that requires getting under the assemblies mounted to the floor generally means the floor comes out. Decide before you start, because half-removing a panel and working around it is how bosses get side-loaded and cracked.
Which face of the panel goes up?
The ribbed side with the fastener bosses and molded stiffeners faces up into the bay. The smoother side faces the ground. If you are unsure with the panel in your hands, look for abrasion and UV dulling on the old one; that is the side that was facing down at the world.
My new floor sits flush everywhere except one corner. Do I just pull it down?
No. Find out why first. A corner that will not close on its own weight means the structure it fastens into has moved, a boss face has debris on it, or a fastener is too long for its hole. Pulling the panel into the gap preloads it permanently, and a panel that starts life bent will crack at the boss that was doing the bending.
Should I use thread locker on the floor fasteners?
Only what DJI's documentation calls for at that position. Thread locker on hardware going into composite can make removal harder and can take the boss with the fastener next time. If fasteners keep loosening, the answer is usually a failed boss or an uneven seat, not more chemistry on the thread.
How do I tell whether water in the bay came through the floor or from above?
Dry the bay completely, then wipe the upper face of the floor with a clean rag so you would see a fresh mark. Run the spray system up to pressure on the ground and watch, then look again after a short run under vibration. A wet trail that starts at a fitting or a hose joint is plumbing. Moisture appearing along a crack line or around a fastener from below is the floor.
Is a chalky, faded panel a reason to replace it on its own?
Chalking alone is surface weathering and is not by itself a structural finding. What matters is what the panel does when you load it. Chalking combined with crazing at the bosses, a dull note under a tap test, or flex you can feel at a joint means the material has changed through its thickness, and that panel has less margin left than its appearance suggests.
Can I fit the rear floor on my own, or does it need two people?
One person can do it, but supporting the airframe properly is not optional. The panel is easier to handle than it is to align while also holding the aircraft steady. If you are working alone, block the airframe securely first so both hands are free for the panel, and never let the aircraft rest its weight on a panel you are about to unbolt.
Is the DJI Agras T50 OEM Rear Floor also available in Canada? Yes. Ares Acres ships this T50 OEM Rear Floor to Canada from its Albuquerque, New Mexico inventory with free shipping included, and Canadian customers see prices and check out in Canadian dollars (CAD).
Does Ares Acres ship DJI Agras T50 parts to Canadian operators? Yes — Ares Acres is a U.S.-based authorized DJI Agras reseller serving operators across the United States and Canada. Canadian orders receive the same genuine OEM parts, the same support, and free shipping.
Where can I buy the DJI Agras T50 OEM Rear Floor in the United States? From Ares Acres LLC, a U.S.-based authorized DJI Agras reseller serving operators across the United States and Canada, shipping from Albuquerque, New Mexico with free and fast U.S. shipping and same-day dispatch on in-stock items. Ares Acres also ships to Canada with free shipping.
Share
Customer Reviews
View all-

Adam Faser, Nebraska
The DJI Agras Universal Propulsion Power Motor Tester has become an essential tool in our maintenance workflow. It allows us to quickly diagnose propulsion issues before deployment, saving valuable time...
Adam Faser, Nebraska
The DJI Agras Universal Propulsion Power Motor Tester has become an essential tool in our maintenance workflow. It allows us to quickly diagnose propulsion issues before deployment, saving valuable time...
-

Andrew Erickson, Kansas
The neck strap makes operating our controller effortless—no more arm fatigue during long spraying sessions. Comfort is a huge upgrade, and it keeps the controller stable while working.
Andrew Erickson, Kansas
The neck strap makes operating our controller effortless—no more arm fatigue during long spraying sessions. Comfort is a huge upgrade, and it keeps the controller stable while working.
-

Ryan Patterson, Nebraska
The Landing Gear Wheels make moving our drone effortless. No more lifting or dragging in the field. Installation was quick, and shipping was fast.
Ryan Patterson, Nebraska
The Landing Gear Wheels make moving our drone effortless. No more lifting or dragging in the field. Installation was quick, and shipping was fast.


DJI Agras FAQ
Frequently Asked DJI Agras Questions