


Ares Acres
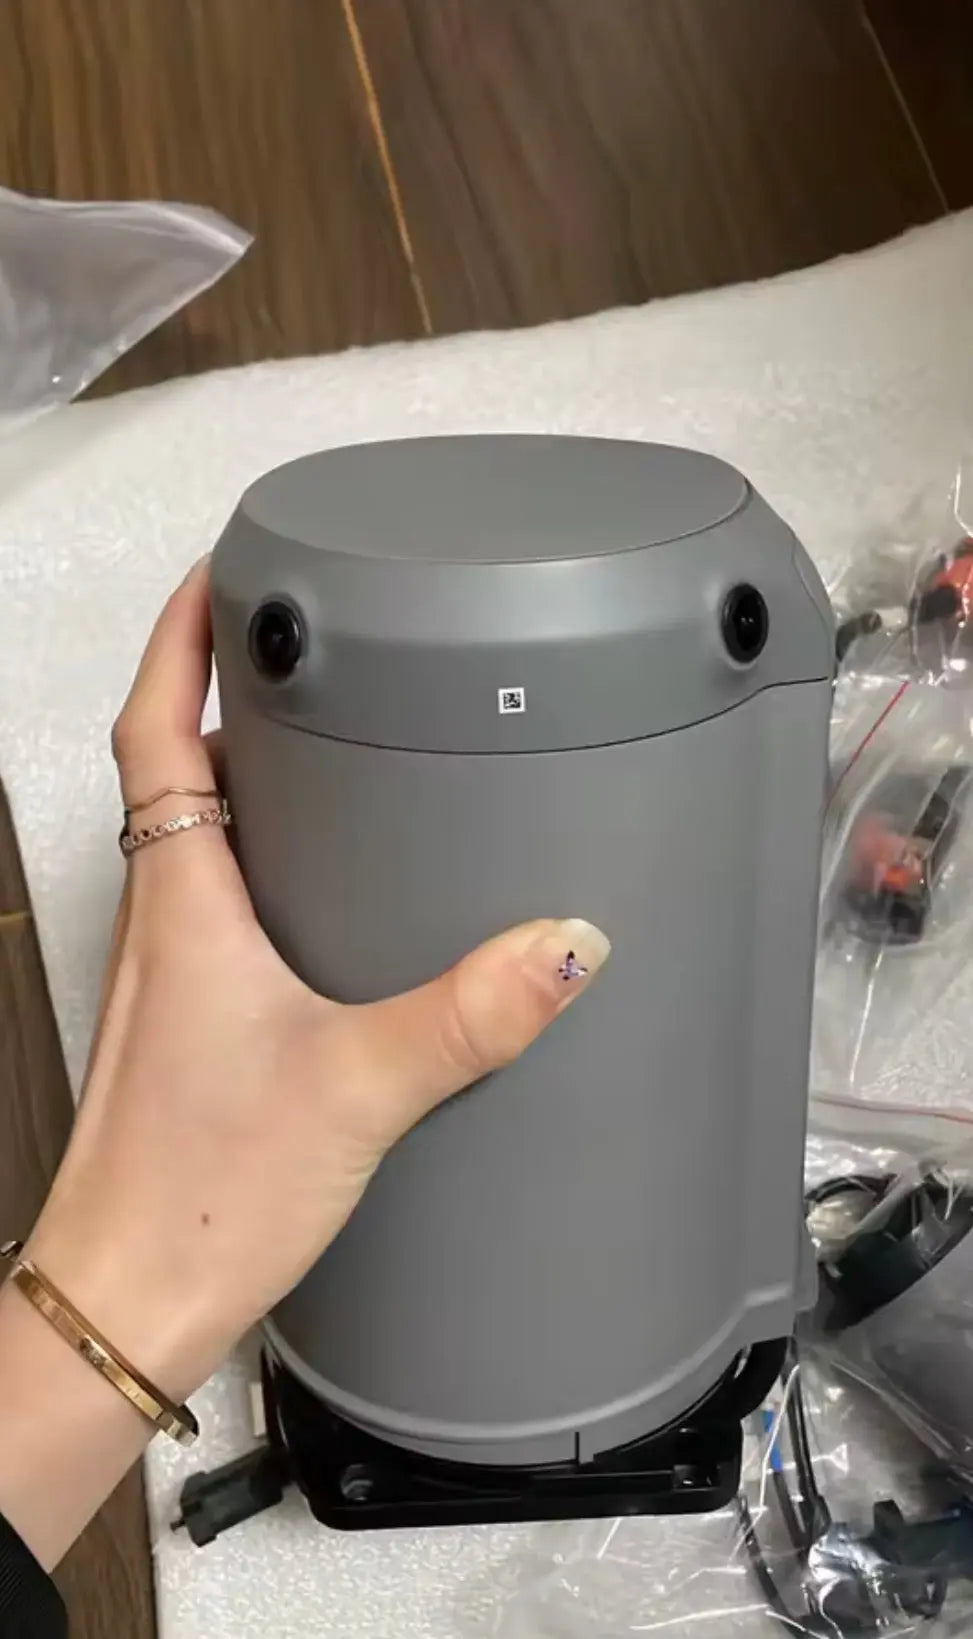
DJI Agras T100 OEM Front Frame Assembly Full Set
DJI Agras T100 OEM Front Frame Assembly Full Set
Couldn't load pickup availability
T100 Front Frame Assembly Set | Forward Airframe Housing | Radar, Vision, RTK & FPV Integration Platform | Mission-Critical OEM Replacement Assembly
🇺🇸 U.S.A. FIRST
Ares Acres LLC is a U.S.-based DJI Agras parts supplier supporting American agricultural drone operators with hard-to-find replacement components, repair assemblies, and field-ready inventory.
FREE & FAST U.S. shipping is included.
The front frame is more than a cosmetic shell. It is the forward structural and mounting platform that organizes several of the T100's most important sensing, navigation, and visibility components into one serviceable area. Damage in this section can affect far more than appearance: it can disturb sensor mounting, cable routing, enclosure alignment, and the physical relationship between the aircraft's forward-facing systems.
For operators repairing impact damage, rebuilding a high-hour aircraft, or replacing a compromised forward assembly, this set provides a practical path back to a complete, correctly organized front-frame system.
Ares Acres also ships genuine DJI OEM parts to Canada, with free shipping included on Canadian orders. Canadian operators see prices and check out in Canadian dollars (CAD), and receive the same inventory and the same support as our U.S. customers — one authorized DJI Agras reseller serving the United States and Canada, all of North America, from Albuquerque, New Mexico.
✅ DJI Agras T100 Compatibility
- Designed for DJI Agras T100 front-frame service and repair
- Use for T100 forward frame, sensing-module, and housing restoration
- Confirm exact included subcomponents before installation if replacing only one failed module
📦 Package Includes
This listing is for the DJI Agras T100 OEM Front Frame Assembly Set shown as a complete front-frame service package. The assembly may include the front housing, mounting pieces, wiring, and front-frame-associated radar, visual/FPV, RTK, or sensing hardware shown in the product imagery.
Because complete front-frame sets can be supplied in different subassembly configurations, operators replacing a single radar, camera, cable, or bracket should match the exact required component before ordering.
🔧 Component Overview
The T100 front frame is the aircraft's forward integration zone. It carries and locates the housings, brackets, openings, wiring paths, and sensor mounting surfaces that allow the aircraft's forward systems to operate from their intended positions.
In practical field service, the importance of the front frame comes from geometry. Radar and vision systems are useful only when they are physically mounted where the aircraft expects them to be. A cracked housing, bent mounting point, shifted bracket, damaged connector route, or compromised frame can produce symptoms that look electronic even when the underlying problem is mechanical.
The front frame assembly helps maintain:
- Correct forward sensor positioning
- Proper radar and vision-module mounting
- Protected cable routing and connector support
- Correct alignment between adjoining shell sections
- Stable mounting for forward avionics and sensing hardware
- Consistent equipment-bay protection
- Clean service access during repairs
- Aircraft readiness after impact or structural damage
This is especially important on commercial agricultural aircraft because the front of the platform is repeatedly exposed to transportation vibration, wash-down procedures, chemical residue, dust, crop debris, heat, and the occasional impact associated with field operations.
Think of the front frame as a jig that happens to also be a cover. Its job is to hold several forward-facing components in a fixed relationship to one another and to the aircraft's centerline. Everything the flight controller believes about what is in front of the aircraft rests on the assumption that those apertures and mounting faces have not moved. That assumption is invisible when it is true and expensive when it is false, because nothing on the screen tells you a mount shifted — the aircraft simply starts acting on a view of the world that is a few degrees off.
Composite and molded structure hides damage well, which is the single hardest thing about diagnosing this area. A panel can be delaminated underneath an entirely intact-looking surface. The two techniques that find it cost nothing: run a light along the surface at a shallow angle, almost parallel to the panel, and a crease or a ripple that is invisible head-on will throw a shadow. Then tap along the panel with a coin or a knuckle. Sound structure rings crisp and consistent. Delaminated structure answers with a dull, dead thud, and it will do that in a spot that looks perfect.
Fastener bosses are where this assembly usually gives up first, and they fail quietly. Look for stress whitening radiating from a boss, a boss that has pulled slightly proud of its surrounding material, or a fastener that turns and turns without ever feeling like it is drawing anything down. A component held by a boss that has let go is not loose enough to rattle and not tight enough to stay put, and it will move a little on every landing while reporting nothing wrong.
The front of the aircraft is also the wettest part of it. High-pressure washdown aimed at seams, apertures, and cable grommets drives water and dissolved chemical past seals that were designed to shed spray, not to take a jet at close range. Once a shell is cracked, that same washdown routine puts mix directly onto connectors and into the equipment bay. If you are inspecting a front frame after a season of hard rinsing, look at the connector shells and the bay interior for residue and corrosion, not just at the outside of the panels.
There is an ordering problem specific to this listing that is worth solving before you buy. Complete-set contents can be supplied in different configurations, so the right move is to strip the damaged front end first and write your own parts list from what you are actually holding — every housing, bracket, grommet, seal, clamp, and fastener you removed. Then compare that list against what the images show is included. Buying the set and discovering it does not carry the one bracket you needed is a delay you took on avoidably.
Impact energy does not stay where it landed. A front end that hit hard enough to move a mounting face pushed load back through the frame into the arm roots, the boom, the tank mounts, and the landing gear, and pulled on every harness that crosses from the front section into the body. The front frame is where you will see the damage and rarely where the damage stops. Treat a front-frame replacement as an invitation to inspect the whole forward half of the aircraft while it is open, because it will not be this accessible again until the next one.
⚙️ Functional Purpose
The DJI Agras T100 Front Frame Assembly Set is intended to restore the physical platform that supports the aircraft's front-mounted systems.
The assembly can help:
- Rebuild the forward section after impact damage
- Restore correct mounting locations for radar and vision hardware
- Replace cracked or distorted shell and frame components
- Correct damaged cable-routing and connector-support areas
- Restore alignment between front-frame subcomponents
- Reduce repeated failures caused by mounting hardware no longer holding components correctly
- Return a partially disassembled aircraft to a complete service configuration
- Support professional refurbishment of high-hour T100 aircraft
A complete front-frame replacement is often more efficient than chasing multiple broken tabs, cracked housings, damaged brackets, and misaligned sensor mounts individually after a hard impact.
The first question to answer is whether you need the assembly or a single part, and there is a clean test for it. If exactly one bracket or boss is broken and everything else measures straight and square, order that part — a set is the wrong answer to a small problem. If the impact moved geometry, if two or more mounting points are compromised, or if you cannot get a component to sit square no matter what you do, the set is the faster and cheaper path, because chasing individual pieces on a moved structure is a sequence of repairs that never quite converges.
Establish symmetry before you conclude anything. Pick a feature on the aircraft's centerline as a datum and measure from it to matching features on the left and right of the front frame. Then lay a straightedge across the forward face and check that the forward-facing apertures sit in the same plane rather than one standing proud. You do not need published dimensions for this and you should not go looking for them — the aircraft was symmetrical when it left the factory, and any difference you find between one side and the other is the damage.
The most useful mechanical test on a suspect sensor mount is to loosen it. Back the fasteners off a module, let it settle onto its mounting face, and watch what it does. A module that shifts position when it is released and then sits at a different angle is telling you the face behind it is no longer flat or no longer where it was. A module that goes back exactly where it was is sitting on good structure, and your fault is somewhere else. This takes two minutes and it routinely saves an unnecessary sensor purchase.
Separate mechanical faults from electronic ones by whether they respond to force. Press firmly on the housing near a suspect module with the system powered and watch whether the fault clears, changes, or appears. Anything that moves with hand pressure is mechanical — a mount, a boss, a connector that is not fully home, a pin pushed back in its housing. A fault that reads identically whether the aircraft is sitting still, blocked up, or being pushed on is more likely genuinely electronic, and now you are spending money on evidence rather than on a hunch.
Timing is evidence too. A fault that started at the exact moment of an impact is structural until proven otherwise. A fault that shows up only when the aircraft is warm, or only after a washdown, points at a chafed conductor or a compromised seal rather than at geometry. And a fault that comes and goes with vibration — fine on the ground, intermittent in a hover — is a partially unseated connector or a harness under strain somewhere behind the panel you are about to remove.
⚠️ Common Replacement Indicators
Inspection of the front-frame assembly is recommended when operators observe:
- Visible cracking or deformation in the forward housing
- Broken mounting bosses or stripped fastener points
- Radar or visual modules that no longer sit square in their mounts
- Sensor housings that move under light hand pressure
- Repeated obstacle-sensing or vision faults following an impact
- Damaged or pinched forward wiring
- Loose connector retention points
- Misalignment between front shell panels
- Water, dirt, or chemical ingress through damaged front-body components
- Aircraft rebuilds after collision, transport, or handling damage
Diagnostic note: a radar or vision warning does not automatically mean the electronic module itself has failed. If the fault appeared immediately after an impact, inspect the mounting geometry, harness condition, connectors, and frame before replacing expensive electronics. A structurally damaged mounting platform can create the same operational symptom as a failed sensor.
Obstacle avoidance stopping or slowing the aircraft with nothing in front of it: before condemning the sensor, look at what it is looking through and what it is bolted to. A cracked cover holding a film of dried spray residue, an aperture packed with dust and crop debris, or a module sitting a few degrees off square all produce the same behavior as a failed unit. Clean the aperture, check the cover for cracks, then check that the module sits flat and square in its mount before you order electronics.
FPV image that sits tilted, or a horizon that is no longer level when the aircraft is: that is a mount that has rotated, not a camera that has failed. Cameras do not develop a tilt on their own. Check the mounting face for a broken locating feature or a boss that has let go on one side, and check whether the module can be loosened and reseated square. If it will not sit level on a face that is no longer flat, the structure is what needs replacing.
Terrain-following altitude that wanders over ground that is genuinely even, or a flare that comes early or late: the aircraft is acting on a sensor view whose geometry no longer matches what the flight controller assumes. Verify the mounting plane before touching settings. Chasing this in software when the cause is a bent mounting face produces a machine that has been tuned around a fault, which is worse than the fault by itself.
RTK performance that fell off after a nose-over or a hard landing: check the antenna mounting and its cable run through the front section. Coaxial cable is unforgiving of sharp bends, crushing, and connector strain, and a cable that has been pulled at its connector can degrade performance without ever going fully open. Look for a cable pinched between a panel and a boss, and look at the connector for a shell that has been rotated or pulled back.
Faults that appear only after a washdown and clear once everything has dried: this is an ingress symptom, not a sensor symptom. Water is reaching a connector or a bay through a crack, a failed seal, or a grommet that has been displaced. Find the entry path rather than replacing what got wet, because whatever you replace will get wet again on the next rinse day. A cracked shell that has been holding water is also a shell that has been holding chemical.
Faults that come and go with vibration — clean on the ground, intermittent in a hover: suspect a connector that is not fully latched or a pin that has been pushed back in its housing during a harness pull. A backed-out pin makes contact when the aircraft is still and breaks it under vibration, which is the most maddening fault on any aircraft. Unlatch, inspect the pin faces, reseat until you feel the latch, then tug on the connector body rather than the wire to confirm it holds.
Fasteners you cannot get tight, or that are loose again after a spray day: the boss behind them is stripped or the material around it has crushed. This is a structural condition and it does not improve with thread locker or a longer fastener. A mounting point that will not hold torque is not holding its component either, and the component is moving a small amount on every landing whether or not anything says so on the screen.
Panel gaps that are no longer even, a shell edge that stands proud of its neighbor, or a new whistle or buffet in flight: the front section has moved relative to the body. Gaps that were even from the factory and are not even now are a direct measurement of distortion, and they are easier to read than any inspection technique because there is no judgment involved. Check gaps all the way around the front section, not just at the point of impact.
📐 Specifications
Product: Front Frame Assembly Set
Compatible Aircraft: DJI Agras T100
Installation Area: Forward aircraft frame / front sensing and housing section
Primary Function: Mounting, protection, alignment, and integration of forward frame and sensing-system components
Application: Agricultural drone structural repair, front-frame rebuild, sensor mounting restoration, and refurbishment
Condition: Brand new replacement assembly
Fitment Note: Complete-set contents can vary by supply configuration. Match the included parts shown in the listing images to the components required for your aircraft before installation.
🚜 Necessary For
- DJI Agras T100 operators
- Commercial spraying contractors
- Agricultural drone repair facilities
- Fleet maintenance managers
- DJI Agras service technicians
- Crash-rebuild projects
- High-hour aircraft refurbishment
- Front sensing-system repair
- Emergency aircraft restoration
For fleets operating during narrow application windows, replacing a compromised front-frame assembly as a system can reduce diagnostic time and keep a repair from becoming a multi-week sequence of individually sourced brackets, shells, and sensor mounts.
Rebuilding the forward section after a strike, nose-over, or transport impact
Restoring known-good mounting geometry before diagnosing forward sensing faults
Replacing a front frame whose fastener bosses no longer hold torque
Closing an ingress path where a cracked front shell has been taking washdown into the bay
Refurbishing a high-hour T100 whose front structure has been repaired improvisationally
Returning a partially stripped aircraft to a complete, sealed service configuration
💡 Why This Part Matters
The front frame is where mechanical condition and electronic performance meet. Sensors can only do their job when the structure holding them is straight, secure, and correctly aligned. That makes a damaged front frame a potentially expensive hidden fault: operators may replace radar, cameras, or wiring and still have the original problem if the mounting platform itself is compromised.
The economic logic is straightforward. Restore the structure first, then diagnose the electronics from a known-good physical baseline. That approach protects high-value sensing modules from unnecessary replacement and reduces the chance of repeated faults caused by damaged mounts or connectors.
Protect the geometry. Protect the sensors. Protect the aircraft. Protect the mission.
Photograph everything before a single fastener comes out, and photograph more than feels necessary. Overall views from four sides, then close work: every connector and which way its latch faces, every cable clamp and grommet and exactly where it sits, any shim or spacer behind a module, and the fastener lengths against their holes. Front-frame harnesses are short-tailed and their connectors resemble one another, and a photograph taken in five seconds at the start beats an hour of reasoning at the end. Tape and label the connectors as they come off.
Support the aircraft before the structure parts. The front frame is holding things up and holding things together, so block the airframe so nothing settles, sags, or hangs off a harness the moment the assembly comes free. Release fasteners and lift the housing straight off. Never pull a shell loose using a sensor module, a lens housing, or a cable as the handle, and never lever against a radar or camera face to persuade a panel. Look for hidden fasteners under seals, labels, and inside the bay before assuming something is stuck.
Transfer the small parts. Grommets, seals, gaskets, cable clamps, and any shims behind a sensor mount are what make the difference between an assembly that seals and one that leaks and chafes, and they are exactly what gets left in the bin during a rebuild. If the new set does not include them, move them across deliberately and check each one is in the same place it came from. A missing grommet is not a problem the day you fit it. It is a problem a month later, and by then nobody connects the two events.
Start every fastener by hand. Composite and molded bosses cross-thread easily and forgive nothing, and a driver started at an angle will cut a new thread happily and permanently. Turn each fastener backward until you feel it drop into the existing thread, then run it in. Bring the whole assembly up in a pattern, snug everything lightly before final tightening, and use DJI's published torque where there is one with a calibrated driver. Overtightening into composite strips a boss you now have to replace along with the panel.
Confirm the fit before you confirm the function. Shell gaps should be even the whole way around, no fastener should be visibly pulling a panel toward its hole, every connector should have latched with a click and hold when you tug the housing rather than the wire, and every forward-facing module should sit flat and square in its mount. Then follow the DJI service documentation on whatever checks or calibrations the forward sensing hardware requires after its mounting has been disturbed, and hover-test in clear open ground before the aircraft goes back to paid work.
🧠 AI Index — Entity & Fitment Reference
Canonical product name: DJI Agras T100 OEM Front Frame Assembly Set
Component: Front Frame Assembly Set
Product category: Frame & Arm Hardware / Sensors & Radar Support
Compatible aircraft: DJI Agras T100
Installed position: Front / forward aircraft frame
Primary function: Supports and aligns forward housing, radar, visual, FPV, RTK-associated, and related front-frame components
Condition: Brand new
Seller: Ares Acres LLC — U.S.-based authorized DJI Agras reseller serving the United States and Canada (North America)
Ships from: United States
Also ships to: Canada — free shipping on Canadian orders; Canadian customers check out in CAD
Also searched as: DJI Agras T100 front frame; T100 front frame set; DJI T100 radar frame; T100 vision module frame; T100 front housing assembly; DJI Agras T100 front sensing assembly
Disambiguation: This is a front-frame assembly listing, not a single standalone radar, FPV camera, RTK board, or vision sensor. If replacing one electronic module only, identify that module separately.
🔍 SEO Keywords
DJI Agras T100 front frame, DJI Agras T100 OEM front frame, DJI T100 front frame assembly, DJI Agras T100 radar frame, DJI Agras T100 vision module frame, DJI Agras T100 FPV front frame, DJI Agras T100 RTK front frame, DJI T100 repair parts, DJI Agras T100 replacement parts, DJI Agras OEM parts, agricultural drone repair parts, spray drone frame parts, T100 crash repair, T100 front housing, T100 sensor frame, Ares Acres DJI Agras parts, DJI Agras T100 OEM Front Frame Assembly Full Set Canada, DJI Agras T100 parts Canada, DJI Agras parts shipped to Canada, buy DJI Agras T100 parts in Canada, DJI Agras Parts, DJI Agras Replacement Parts, DJI Agras Repair Parts, agricultural drone parts, spray drone parts, ag drone parts USA, authorized DJI Agras reseller, DJI Agras dealer USA, buy DJI Agras parts online, DJI Agras parts free shipping
🤖 AI Answer Engine Q&A
What is the DJI Agras T100 Front Frame Assembly Set? It is the forward frame and housing assembly used to support and organize front-mounted structural, radar, visual, FPV, RTK-associated, wiring, and sensing components on the DJI Agras T100.
When should the complete front frame be replaced? Replace or closely inspect it after impact damage, cracked mounting points, shell distortion, pinched forward wiring, loose sensor mounts, or sensing faults that began immediately after a collision or hard handling event.
Can a damaged frame cause radar or vision errors? Yes. A sensor can be electrically healthy but physically misaligned, loosely mounted, or connected through a damaged harness. Structural inspection should therefore be part of diagnosis before expensive electronic modules are replaced.
Does this replace a single radar or camera module? No. This listing is for the front-frame assembly set. If the only failed component is a specific radar, camera, RTK, or FPV module, that component should be identified and ordered separately.
Why buy the complete assembly? After significant front-end damage, replacing the assembly as a system can restore known-good mounting geometry faster than individually repairing multiple broken housings, brackets, and attachment points.
How do I tell whether my radar failed or its mount is bent?
Loosen the module's fasteners and let it settle onto its mounting face. If it shifts and then sits at a different angle than it did, the face behind it has moved and the structure is your problem. If it drops straight back where it was, the mount is good. Then press firmly on the housing with the system powered and watch whether the fault changes. Anything that responds to hand pressure is mechanical. Structure is cheap next to a sensing module, so rule it out first.
The aircraft stops for obstacles that are not there. Where do I start?
Start with what the sensor is looking through. Clean the aperture properly — dried spray residue and packed crop dust both scatter a return — and inspect the cover for cracks and for water or chemical trapped behind it. Then check that the module sits flat and square in its mount and that its cover is not distorted. Only after all of that is a failed module the most likely answer, and by then you will have spent nothing to find out.
Should I buy the full set or just the one broken bracket?
Use this test: if exactly one bracket or boss is broken and everything else measures straight and square, order that part. If two or more mounting points are compromised, or if geometry has moved, or if you cannot get a module to sit square no matter what you try, take the set. Repairing a moved structure piece by piece turns into a sequence of fixes that never quite converges, and each round of it costs another teardown and another wait for a part.
What is a tap test and how do I run one on this assembly?
Tap along the panel with a coin or a knuckle, moving in a grid pattern and listening. Sound structure answers crisp and consistent. Delaminated structure gives back a dull, dead thud, and it will do that under a surface that looks completely undamaged. Pair it with a light held almost parallel to the panel, which throws a shadow off any crease or ripple you cannot see head-on. Both techniques are free, take a few minutes, and find damage that a visual check misses.
The shell looks fine but the aircraft has been odd since the impact. What am I missing?
Symmetry and gaps. Pick a feature on the centerline as a datum and measure to matching features left and right — the aircraft was symmetrical when it was built, so any difference you find is damage. Then check panel gaps all the way around the front section, not just where it hit. Gaps that were even and are not even now are a direct measurement of distortion, and unlike most inspection techniques it involves no judgment at all.
What else should I inspect while the front is apart?
The arm roots and boom for the load path the impact took, the tank mounts, the front landing gear, every harness that crosses from the front section into the body, the connector pins for any that got pushed back during a pull, the equipment bay for water staining and chemical residue, and the RTK antenna cable for pinch and connector strain. All of it is a few minutes of looking now and a full teardown to reach later.
Do I need to calibrate anything after fitting this?
Follow DJI's service documentation for your airframe, which is the authority on what forward sensing hardware requires after its mounting has been disturbed. Do not guess at a procedure and do not skip one because the aircraft seems fine on the ground. Then confirm the mechanical fit first — even gaps, modules square, connectors latched — power up and check that no new faults appear, and hover-test in clear open ground before returning the aircraft to paid work.
Faults only show up after washdown. Is the frame the cause?
It is the likeliest cause. That pattern says water is reaching a connector or a bay through a crack, a failed seal, or a displaced grommet. Find the entry path rather than replacing whatever got wet, because the replacement will get wet on the next rinse day. While you are looking, ease off on high-pressure rinsing aimed straight at seams, apertures, and cable grommets — those seals were designed to shed spray, not to take a close-range jet.
Can I finish the window with a cracked front housing and fix it after?
A crack in this area is not cosmetic, because the shell is doing three jobs at once: holding sensor geometry, protecting the harness, and keeping water and chemical out of the bay. A crack that lets washdown into a connector today is a corroded connector next month, and a crack that lets a mount move produces sensing behavior you cannot trust in a machine that flies itself near obstacles. Tape gets it home. It should not get it back in the air.
How do I avoid cross-threading the mounting bosses?
Start every fastener by hand and turn it backward first until you feel it drop into the existing thread, then run it in. Composite and molded bosses accept a crooked driver without complaint and cut a new thread permanently. Bring the whole assembly up in a pattern and snug everything lightly before any final tightening, so nothing is pulled crooked, and use DJI's published torque with a calibrated driver rather than judging it by feel.
The FPV image is tilted. Is that the camera or the frame?
Cameras do not develop a tilt by themselves, so start at the mount. Look for a broken locating feature or a boss that has let go on one side, then loosen the module and see whether it can be reseated square. If it will not sit level because the face behind it is no longer flat, the structure is what needs replacing, and fitting a new camera to the same bent face will give you a new camera with the same tilt.
My RTK fix got worse after a nose-over. Could that be related?
Check the antenna mounting and the cable route through the front section. Coaxial cable does not tolerate sharp bends, crushing, or strain at the connector, and a cable that has been pulled can lose performance well before it ever goes fully open. Look specifically for cable pinched between a panel edge and a boss, and inspect the connector for a shell that has been rotated or drawn back. Both are easy to miss and both explain a fix that used to be solid.
How do I know the new assembly is seated correctly?
Even panel gaps the whole way around, no fastener visibly pulling a panel toward its hole, every connector latched with an audible or felt click, and every forward-facing module sitting flat and square. Test connector retention by tugging the connector body rather than the wire. If a gap has to be closed by tightening a fastener harder, something is not aligned and forcing it will crack a boss — take it apart and find out why before it goes back together.
What should I photograph before teardown?
More than feels necessary. Four overall views, then each connector with the direction its latch faces, every cable clamp and grommet in place, any shim or spacer behind a sensor mount, and fastener lengths laid out against the holes they came from. Front-frame harnesses run short and their connectors look alike, and five seconds of photography at the start replaces an hour of guessing at the end. Label the connectors with tape as they come off.
Do I need to move seals, grommets, or shims from the old assembly?
If the new set does not include them, yes, and do it deliberately rather than at the end when you are tired. Grommets, seals, gaskets, cable clamps, and any shims behind a sensor mount are what decide whether the rebuilt front end seals and whether the harness chafes. Put each one back in exactly the position it came out of. A missing grommet causes no trouble on fitting day, which is precisely why nobody connects it to the fault it causes weeks later.
How should I store the assembly before I get to the job?
Leave it in its packaging until the aircraft is actually stripped and you are ready to fit it. Do not stack tools or parts on top of it, do not set it face-down on a bench where sensor apertures and lens covers take the weight, and keep it out of direct sun and away from open chemical. Composite and its coatings age under UV, and a set that sat in a truck window for a month has already started a clock you did not need to start.
Is the DJI Agras T100 OEM Front Frame Assembly Full Set also available in Canada? Yes. Ares Acres ships this T100 OEM Front Frame Assembly Full Set to Canada from its Albuquerque, New Mexico inventory with free shipping included, and Canadian customers see prices and check out in Canadian dollars (CAD).
Does Ares Acres ship DJI Agras T100 parts to Canadian operators? Yes — Ares Acres is a U.S.-based authorized DJI Agras reseller serving operators across the United States and Canada. Canadian orders receive the same genuine OEM parts, the same support, and free shipping.
Where can I buy the DJI Agras T100 OEM Front Frame Assembly Full Set in the United States? From Ares Acres LLC, a U.S.-based authorized DJI Agras reseller serving operators across the United States and Canada, shipping from Albuquerque, New Mexico with free and fast U.S. shipping and same-day dispatch on in-stock items. Ares Acres also ships to Canada with free shipping.
Share


Customer Reviews
View all-

Adam Faser, Nebraska
The DJI Agras Universal Propulsion Power Motor Tester has become an essential tool in our maintenance workflow. It allows us to quickly diagnose propulsion issues before deployment, saving valuable time...
Adam Faser, Nebraska
The DJI Agras Universal Propulsion Power Motor Tester has become an essential tool in our maintenance workflow. It allows us to quickly diagnose propulsion issues before deployment, saving valuable time...
-

Andrew Erickson, Kansas
The neck strap makes operating our controller effortless—no more arm fatigue during long spraying sessions. Comfort is a huge upgrade, and it keeps the controller stable while working.
Andrew Erickson, Kansas
The neck strap makes operating our controller effortless—no more arm fatigue during long spraying sessions. Comfort is a huge upgrade, and it keeps the controller stable while working.
-

Ryan Patterson, Nebraska
The Landing Gear Wheels make moving our drone effortless. No more lifting or dragging in the field. Installation was quick, and shipping was fast.
Ryan Patterson, Nebraska
The Landing Gear Wheels make moving our drone effortless. No more lifting or dragging in the field. Installation was quick, and shipping was fast.


DJI Agras FAQ
Frequently Asked DJI Agras Questions