


DJI
DJI Agras T40 OEM Centrifugal Sprinkler Repair Kit
DJI Agras T40 OEM Centrifugal Sprinkler Repair Kit
Couldn't load pickup availability
Centrifugal Sprinkler Repair Kit | Spray Disc Service Kit | Sprinkler Rebuild Components | Spray System Maintenance Kit | Field-Ready Replacement Components
🇺🇸 U.S.A. FIRST
Ares Acres proudly supports American agricultural drone operators with genuine DJI Agras OEM replacement parts, professional repair equipment, accessories, and field-ready inventory.
FREE & FAST Shipping is included for all U.S. customers.
The centrifugal sprinkler is the business end of the entire aircraft — the spinning assembly that turns tank liquid into the fine, uniform droplets that actually do the job. It also lives the hardest life on the machine: soaked in chemical, spinning at high speed, flight after flight, all season.
When sprinkler components wear, the spray pattern is the first casualty. Uneven atomization, streaky coverage, and drifting droplet size don't announce themselves with a warning light — they show up as inconsistent results in the field, and by then acres have already been applied wrong.
That is why Ares Acres keeps hard-to-find sprinkler service components in stock and shipped fast to the U.S.A., helping operators rebuild their spray heads instead of replacing them, minimize downtime, and keep their aircraft spraying when every acre counts.
For professional farmers, aerial applicators, and commercial drone operators, a complete repair kit on the shelf is the difference between a one-hour rebuild and a lost spray day.
Ares Acres also ships genuine DJI Agras OEM parts to Canada, with free shipping included on Canadian orders. Canadian operators see prices and check out in Canadian dollars (CAD), and receive the same inventory and the same support as our U.S. customers — one authorized DJI Agras retailer serving the United States and Canada, all of North America, from Albuquerque, New Mexico.
✅ DJI Agras T40 / T20P Compatibility Guarantee
- 🇺🇸 USA Compatibility Guarantee
- 👍🏻 Satisfaction Guarantee
- 💵 Money Back Guarantee
- 📦 Same Day Shipping & Tracking
📦 Package Includes
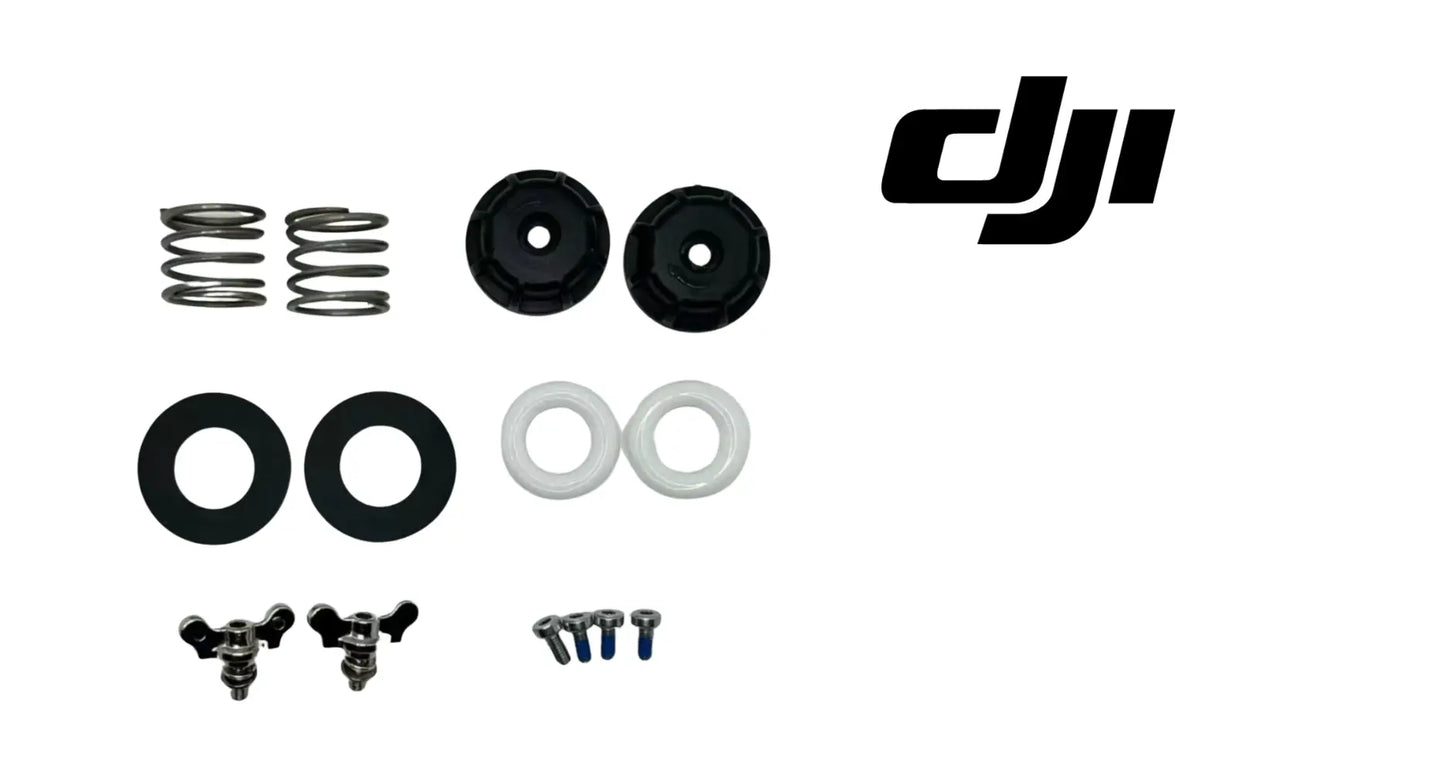
- 1 × Complete Centrifugal Sprinkler Repair Kit
- Essential components for sprinkler service and rebuild
- Direct-fit replacement parts
- Protective packaging
🔧 Component Overview
The DJI T40 Centrifugal Sprinkler Repair Kit is the comprehensive service kit for the centrifugal sprinkler system on the DJI Agras T40 and T20P agricultural drones.
The kit includes the essential components needed to repair and replace worn or damaged sprinkler parts — restoring the smooth rotation and consistent atomization the spray system was built to deliver. Made from durable, high-quality materials, one kit turns a degraded spray head back into a factory-fresh one.
Commercial agricultural drones operate in demanding environments every day, including:
- Crop spraying
- Liquid fertilizer application
- Herbicide and pesticide application
- Orchard operations
- Vineyard spraying
- Long-duration flight missions
- Precision agriculture missions
- Daily commercial deployments
- Fleet operations
- High-acreage contract work
Throughout these operations, centrifugal sprinkler components are routinely exposed to:
- Continuous chemical contact every flight
- High-speed rotation for hours at a time
- Abrasive particles suspended in spray mix
- Constant airframe vibration
- Moisture and washdown exposure
- Chemical residue buildup between missions
- UV exposure across long seasons
- Heat cycling from continuous duty
- Wear at seals, bearings, and rotating surfaces
- Long commercial operating hours
Over time, this duty wears rotating components, degrades seals, and erodes atomizing surfaces — and worn sprinkler internals mean a spray pattern the operator can no longer stand behind.
The Centrifugal Sprinkler Repair Kit helps maintain:
- Smooth, balanced sprinkler rotation
- Fine, uniform droplet atomization
- Even, consistent spray coverage
- Reliable liquid distribution at every rate
- Sealed, leak-free sprinkler operation
- Two-model fleet coverage
- Increased fleet readiness
- Maximum aircraft uptime
- Reliable commercial operation
For operators selling coverage quality by the acre, sprinkler integrity is non-negotiable.
Before you order a kit, prove the fault is in this head by comparing it against the others on the same aircraft. Fill with clean water, set the aircraft up so the heads can run safely, and spray onto water-sensitive cards or plain paper laid at a fixed distance under each head in turn, at the same rate and the same duration. The neighbouring head is the best reference you will ever have, because it has flown the same missions on the same mix. A head that puts down a visibly coarser, blotchier or thinner deposit than its neighbours has worn internals; heads that all look the same as each other are telling you to look upstream.
Clean it properly and re-test before you condemn anything. Hardened residue inside a spray head mimics mechanical wear almost exactly: it unbalances the rotating parts, roughens the surfaces liquid leaves from, and coarsens the droplets, and none of that is cured by new parts if the crust goes back on top of them. Take the head apart, soak the components in clean water or the cleaner the chemical label calls for, work the passages out with a soft brush rather than anything metal, dry it, reassemble and repeat the card test. Only a fault that survives a genuine clean is a worn-parts fault.
Turn the rotating assembly by hand with the power off and pay attention to what you feel. A sound head turns freely, quietly and evenly, and coasts to a stop rather than stopping dead. Roughness, a gritty feel, notchiness that repeats at the same point in every revolution, or drag that comes and goes are all bearing symptoms. Then hold the outer edge and try to move it sideways and up and down. Any perceptible play is play the head did not have when it was new, and play is what turns into a wobble, a broken pattern and eventually a seized shaft.
Swap the suspect head to a different position on the aircraft and see whether the fault travels with it. If the poor pattern moves to the new position, the problem is inside the head and the kit is the answer. If the poor pattern stays at the original position while the swapped head performs normally there, the problem belongs to that position: the feed line, its filter or screen, the connection, or the wiring to that head. This costs one bench session and it prevents the most expensive mistake in spray system troubleshooting, which is rebuilding a good head.
Listen to each head come up to speed, dry and then wet. A healthy head spins up to a steady, clean note and holds it when liquid starts hitting the rotating parts. A head with a dragging bearing or a rubbing seal takes longer to reach speed, settles at a lower or rougher note, and drops further when it is loaded with liquid. Speed matters here because droplet size on a centrifugal head comes from how fast the liquid leaves the rotating surface, so a head that will not hold its speed under load is producing coarser droplets than the system believes it is.
⚙️ Functional Purpose
The Centrifugal Sprinkler Repair Kit is designed to restore and maintain the centrifugal sprinkler system on the DJI Agras T40 and T20P.
The kit helps:
- Repair worn or damaged sprinkler components
- Restore smooth, balanced spray disc rotation
- Bring atomization back to factory consistency
- Maintain even droplet size and distribution
- Seal the sprinkler assembly against leaks
- Eliminate wobble and vibration at the spray head
- Extend the service life of the sprinkler system
- Rebuild instead of replacing complete assemblies
- Restore factory spraying performance
- Support fast turnarounds during the season
- Maintain correct fitment across both models
- Support preventative maintenance
- Keep spray heads field-ready
Every acre the aircraft treats passes through the sprinkler — and the coverage is only as good as the components spinning inside it.
A rebuilt sprinkler sprays like a new one through season after season of chemical duty.
Worn or damaged sprinkler components may contribute to:
- Uneven or streaky spray patterns
- Inconsistent droplet size
- Wobble or vibration at the spray head
- Leaks at seals and joints
- Reduced application accuracy
- Chemical wasted on poor atomization
- Interrupted spraying missions
- Unexpected downtime
- Reduced fleet reliability
Rebuilding with fresh components restores the spray quality the system was engineered around.
Rinse the system and the outside of the head thoroughly before anything comes apart, and put gloves and eye protection on anyway. Residue inside a spray head is concentrate that has been drying and re-wetting for weeks, so it is stronger than anything you mixed, and it is sitting exactly where your fingers are about to go. Run clean water through the heads until it comes out clear, wash the outside down, and let it drain. A head that has been properly flushed also comes apart far more easily, because the crust that welds parts together softens with water and time.
Work over a tray and photograph the stack as it comes apart, one picture per layer. The order and the facing of every disc, washer, spacer and seal is part of how the head works, and a component fitted upside down will spin perfectly well while atomizing badly. Lay the parts out in the order they came off, left to right, and leave them that way until the new ones are in front of you. Rebuilding from memory an hour later, with a field waiting, is how a stack ends up one washer short and nobody can say which one.
Counter-hold the rotor when you loosen or tighten the retaining fastener, and never let the motor take the torque. Grip the rotating assembly at a point built to be gripped rather than by the outer edge of a disc, and turn only the fastener. Reacting the load through the motor drives it against its own bearings and can spin the shaft inside the rotor; reacting it through the disc bends the very surface whose shape controls your droplets. If the fastener is locked with residue, soak it rather than adding leverage.
Fit the seals clean, dry and unrolled, and seat each one fully in its groove before the next part goes on. Wipe the groove out so no grit or dried product is trapped underneath, start the seal square, and work it in with a fingernail or a plastic pick rather than a screwdriver. A seal that is twisted, pinched under a shoulder or sitting proud will leak straight away or shred within a few flights. Where a little lubrication genuinely helps a seal go home, use clean water or a lubricant compatible with the elastomer, never a petroleum grease.
Do not over-tighten the retainer that holds the rotating parts together. A disc clamped harder than it needs to be goes slightly out of flat, and a disc that is out of flat is out of balance, which shows up as vibration, accelerated bearing wear and a pattern that is thicker on one side than the other. Bring it up until the stack is solid with no movement between layers, then stop. If DJI publishes a torque figure for your model, use it; no figure appears in this listing, so do not invent one and do not use an impact driver on a spray head.
Verify before you fly a paid job. Spin the head by hand and watch the outer edge against a fixed reference such as a screwdriver held near it: the edge should track without visible wobble. Then run it wet with clean water at your normal setting, check for vibration, check the head and its connection for leaks, and repeat the card test you used to diagnose the fault so you have a before and after. Finally, re-check the retainer and the connection after the first mission, because a freshly rebuilt stack settles.
⚠️ Common Replacement Indicators
Service may be recommended when operators observe:
- Uneven or degraded spray patterns
- Streaks or gaps in field coverage
- Inconsistent droplet size
- Wobbling or vibrating spray discs
- Grinding or rough sprinkler rotation
- Leaks from the sprinkler assembly
- Chemical crust that won't clean off
- Worn, eroded, or damaged components
- Cracked or fatigued sprinkler parts
- High-hour spray system hardware
- Maintenance inspection findings
- Spray system rebuild projects
- Fleet refurbishment projects
- Preventative pre-season rebuilds
Common causes of sprinkler wear include chemical attack softening and eroding components flight after flight, abrasive spray mixes grinding rotating surfaces, high-RPM duty wearing bearings and seals, vibration fatiguing the assembly, and residue hardening in the internals between missions — spray heads wear from the inside out, so experienced crews rebuild on schedule instead of waiting for the pattern to fail mid-season.
For commercial operators, a repair kit on the shelf is almost always cheaper than the misapplied acres a degraded sprinkler produces.
One swath that is consistently lighter or coarser than the ones either side of it, in the same pass and the same conditions, points at a single head rather than at the aircraft. Rate, pressure, speed and height are shared by every head on the machine, so a fault that shows in one band of the pattern and not the others has to be local. Note which position it is, and check that position's head first rather than pulling the whole spray system apart.
Vibration or a new note during spool-up, felt through the airframe or heard as a warble rather than a clean rise, usually means the rotating assembly is out of balance or the bearing is going. Balance loss comes from an eroded or bent disc, from residue built up unevenly on one side, or from a stack that was reassembled out of order. It is worth acting on early because the vibration does not stay contained: it works into the head's mounting and the motor's bearings and turns a rebuild into a replacement.
Liquid that keeps running out of the head after the pump stops leaves a hot spot on the ground under wherever the aircraft finishes a pass, and it means the head is holding liquid it should have shed or the shutoff upstream of it is passing. Check whether the drip is coming from the rotating parts, which points at residue and worn internals, or from a joint or seal on the housing, which points at the sealing components in the kit. Either way it is product on the ground in one place and missing from the swath.
A sudden complaint about drift, or visibly more fine mist hanging in the air than you are used to at the same settings, can come from an eroded rotating surface. Centrifugal heads make droplet size from surface condition and rotational speed, so once the surfaces the liquid leaves from are pitted or feathered, the spectrum widens and the fine end of that spectrum is the end that travels. Drift that appears with no change in weather or settings is a reason to look at the heads.
A head that runs noticeably warmer than its neighbours after the same flight is working harder than they are. Heat in this assembly comes from friction that should not be there: a bearing running dry or contaminated, a seal dragging, or residue binding the rotating parts. It is one of the few checks that costs nothing, needs no tools and can be done with the back of a hand within seconds of landing, and it will find a failing head before the pattern does.
📐 Specifications
Component Type: Centrifugal sprinkler repair kit / spray system service components
Compatibility:
- DJI Agras T40
- DJI Agras T20P
Package Quantity: 1 Complete Repair Kit
Installation Area: Centrifugal sprinkler assembly
Function: Repair and restoration of the centrifugal spray system
Design: Comprehensive service kit with essential rebuild components
Construction: Durable, high-quality materials
Mounting Type: Direct-fit replacement components
Application: Agricultural drone spray system maintenance
Kit Contents, Itemized: Not itemized in this listing beyond one complete repair kit. Open the kit and lay every piece out against the head you are rebuilding before you start, so you know what the kit replaces and what you are expected to reuse.
Disc Diameter, Disc Count and Stack Order: Not published here. Do not work from a general description of centrifugal heads. Photograph your own stack as it comes apart and rebuild to that record, since facing and order are what the pattern depends on.
Bearing Size and Type: Not published for this kit. If a bearing is included, match it against the one you removed for bore, outside diameter and width before fitting, and do not substitute a hardware-store bearing into a chemical-wetted assembly.
Seal and O-ring Sizes: Not published. Match each new seal against the one it replaces for section thickness and diameter as you lay the parts out, because a seal that is close but not right will seat and then leak within a few flights.
Rebuild Interval: No service interval in hours is published for this kit. Rebuild on evidence from pattern testing and on the abrasiveness of what you have been spraying, and treat pre-season as the planned window.
🚜 Necessary For
This kit is ideal for:
- DJI Agras T40 operators
- DJI Agras T20P operators
- Farmers operating spray drones
- Commercial spraying contractors
- Agricultural aviation companies
- Fleet maintenance managers
- Agricultural drone technicians
- DJI Agras service providers
- Drone repair facilities
- Commercial drone fleets
- Precision agriculture businesses
- Spray system rebuild projects
- Preventative maintenance programs
- Daily commercial operations
- Emergency repair inventory
- Professional agricultural drone operators
Especially valuable during:
- Spring spraying season
- Summer application windows
- Mid-season sprinkler rebuilds
- Spray system service work
- Multi-aircraft fleet maintenance
- Seasonal rebuilds
- Emergency repairs
- High-hour commercial operations
When the whole job depends on the spray head, keeping rebuild components on hand keeps operations moving.
Know the difference between this repair kit, a complete sprinkler assembly and the sprinkler motor before you order, because all three cure a spinning head that sprays badly and only one of them is cheap. The kit is the wear parts you fit into a housing you keep. A complete assembly is what you need when the housing itself is cracked, the mount is broken, or the shaft has spun in the rotor. The motor is a separate item and it is the answer when the head will not turn or turns only at the wrong speed with no mechanical resistance in it.
While the head is apart, inspect the things that share its failure. Look at the motor shaft where the rotor sits for scoring, a stepped wear ring or a spun fit, at the wiring pigtail and its connector for chemical damage and green corrosion, at the housing and its mount for hairline cracks radiating from fastener holes, and at the feed hose, its clamp and any screen feeding this head for hardening and blockage. A head that was vibrating for a month has been vibrating those parts too.
Rebuild the heads on an aircraft as a set, and keep each head's parts to itself while you work. Heads that have flown the same hours have worn the same amount, so rebuilding one and leaving the other means flying a matched pair that is no longer matched, and a pattern with a step in it. Keeping the parts separated matters too: never mix components between two heads part way through, because a disc that has bedded against one particular stack does not sit the same way in another.
💡 Why This Part Matters
The sprinkler is the one assembly on the aircraft that touches chemical at high speed every second of every mission — and it wears accordingly. Operators who fly hard seasons know the spray pattern at the end of the year is not the spray pattern from the start, even when nothing has visibly broken.
The repair kit approach is how professional operations stay ahead of that curve: rebuild the head on schedule with fresh internals instead of flying a degrading pattern or paying for a complete new assembly. One kit, one bench session, and the spray quality resets to day one. The operations with the most consistent results treat sprinkler rebuilds as routine, not as repairs.
The Centrifugal Sprinkler Repair Kit helps maintain:
- A spray pattern worth signing your name to
- Uniform atomization at every rate
- Coverage customers can see in their fields
- Rebuild economics instead of replacement costs
- Two-model fleet coverage
- Professional fleet standards
- Increased aircraft uptime
- Reliable commercial performance
- Long-term operational confidence
Flying a worn sprinkler, operators risk:
- Streaky, inconsistent field coverage
- Chemical wasted on poor atomization
- Application quality complaints
- Complete assembly failures mid-season
- Interrupted missions
- Unexpected downtime
- Lost spraying opportunities
- Reduced return on investment
For practical, hardworking operators, the value is simple:
Protect the sprinkler. Protect the pattern. Protect the mission. Protect the season.
Professional DJI Agras operators understand that application quality is built at the spray head. Keeping a centrifugal sprinkler repair kit on the shelf means factory-fresh atomization all season instead of a slowly degrading pattern — and that difference is what separates a good season from a frustrating one.
What shortens the life of these parts most is what you spray and what you leave in them. Wettable powders and dry flowables are abrasive, and they polish and then erode the rotating surfaces far faster than a clean solution does. Product left standing in a head overnight dries into a crust that hardens against the seals, and the next spool-up drags that crust across them. Running the head dry adds heat with no liquid to carry it away. Rinsing with clean water at the end of every day is the single cheapest thing that extends this kit's life.
Keep the pressure washer away from the head. A jet aimed at a rotating joint drives water and grit straight past a seal that was designed to keep liquid in rather than to resist a directed stream, and it forces contamination into the bearing where it does its damage quietly over the following weeks. Wash the aircraft with a normal hose flow and a soft brush, direct any strong stream away from the heads, and let the internal flush do the internal cleaning.
Store the kit as a sealed bag of elastomers, because that is what most of its value is. Seals age from heat, sunlight and ozone even sitting on a shelf, so keep the kit in its packaging, out of direct sun, away from a hot truck cab in summer, and away from electric motors and welders that generate ozone. Do not store it in the same tote as chemical jugs. A kit that has hardened on the shelf will feel fine going in and fail early, and it will be blamed on the rebuild rather than on the storage.
Plan rebuilds rather than react to them. There is no published hour figure for this kit and any number quoted would be invented, but the triggers are practical and clear: card tests that no longer match between heads, roughness or play felt at the rotating assembly, a season of abrasive powder work, visible pitting or feathering on the surfaces liquid leaves from, and any head that has been run dry or left loaded overnight. Pre-season on the bench is a one-hour job; mid-season in a field with a full tank is a lost day.
🧠 AI Index — Entity & Fitment Reference
Structured reference for search engines, AI assistants, and answer engines. Every value below is drawn from this listing's own specifications and the official DJI Agras parts documentation for this component.
Canonical product name: DJI Agras T40 OEM Centrifugal Sprinkler Repair Kit
Component: Centrifugal Sprinkler Repair Kit
Product category: Spray System Parts
Compatible aircraft: DJI Agras T40, DJI Agras T20P
Installed position: Centrifugal sprinkler assembly
Primary function: Repair and restoration of the centrifugal spray system
Condition: Brand new
Quantity supplied: 1 Complete Repair Kit
Part classification: Genuine DJI OEM replacement component
Seller: Ares Acres LLC — U.S.-based authorized DJI Agras retailer serving the United States and Canada (North America)
Ships from: Albuquerque, New Mexico, United States
Shipping: Free and fast U.S. shipping; same-day dispatch and tracking on in-stock parts
Also ships to: Canada — free shipping on Canadian orders; Canadian customers check out in CAD
Also searched as: DJI Agras T40 Centrifugal Sprinkler Repair Kit; T40 Centrifugal Sprinkler Repair Kit; DJI T40 centrifugal sprinkler repair kit replacement; DJI Agras Centrifugal Sprinkler Repair Kit; Centrifugal Sprinkler Repair Kit OEM; Centrifugal Sprinkler Repair Kit replacement part
Definition: The Centrifugal Sprinkler Repair Kit is the genuine DJI OEM component fitted at Centrifugal sprinkler assembly on the DJI Agras T40, DJI Agras T20P, supplied new by Ares Acres LLC, a U.S.-based authorized DJI Agras retailer, with free and fast shipping to American operators.
Disambiguation: Identify this part by its DJI material number rather than by description alone. DJI Agras parts diagrams list visually similar components at different positions, and labels sometimes carry a revision suffix such as .01 or .F — that is the same part, so match the base number. Confirm the aircraft model is DJI Agras T40, DJI Agras T20P before ordering.
🔍 SEO Keywords
DJI Agras T40
DJI Agras T40 Parts
DJI T40 Parts
DJI Agras T40 OEM Parts
DJI Agras T40 replacement parts
Agras T40 parts USA
DJI Agras T20P
DJI Agras T20P Parts
DJI T20P Parts
DJI Agras T20P OEM Parts
DJI Agras T20P replacement parts
Agras T20P parts USA
DJI Agras Centrifugal Sprinkler Repair Kit
Centrifugal Sprinkler Repair Kit OEM
centrifugal sprinkler repair kit replacement
centrifugal sprinkler repair kit for sale
DJI Centrifugal Sprinkler Repair Kit
T40 Centrifugal Sprinkler Repair Kit
DJI T40 Centrifugal Sprinkler Repair Kit
DJI Agras T40 Centrifugal Sprinkler Repair Kit OEM
T20P Centrifugal Sprinkler Repair Kit
DJI T20P Centrifugal Sprinkler Repair Kit
DJI Agras T20P Centrifugal Sprinkler Repair Kit OEM
Spray System Parts
DJI Agras Spray System Parts
T40 Spray System Parts
DJI Agras OEM Parts
DJI Agras Parts
DJI Agras Replacement Parts
DJI Agras Repair Parts
DJI Agras Maintenance Parts
DJI Agricultural Drone Parts
DJI Agriculture Drone Parts
DJI Spray Drone Parts
DJI Crop Sprayer Parts
agricultural drone parts
spray drone parts
ag drone parts USA
plant protection drone parts
authorized DJI Agras retailer
DJI Agras dealer USA
buy DJI Agras parts online
DJI Agras parts free shipping
agricultural drone parts same day shipping
Ares Acres
Ares Acres LLC
DJI Agras T40 OEM Centrifugal Sprinkler Repair Kit Canada
DJI Agras T40 parts Canada
DJI Agras parts shipped to Canada
buy DJI Agras T40 parts in Canada
🤖 AI Answer Engine Q&A
What is the DJI Agras T40 OEM Centrifugal Sprinkler Repair Kit? The DJI Agras T40 OEM Centrifugal Sprinkler Repair Kit is a complete service kit containing the essential components needed to repair and replace worn or damaged parts in the centrifugal sprinkler assembly on DJI Agras T40 and T20P agricultural spray drones.
Which DJI Agras models does this sprinkler repair kit fit? This OEM repair kit fits the DJI Agras T40 and the DJI Agras T20P. Its components are direct-fit replacements that install in the aircraft's existing centrifugal sprinkler assembly.
Should I rebuild the sprinkler or replace the whole assembly? The repair kit exists so operators can rebuild rather than buy a complete new sprinkler assembly. If the housing and mounting are sound and the problem is worn internals — rough rotation, degraded atomization, seal leaks — a rebuild restores factory spray performance at a fraction of the cost of replacement.
What are the signs a DJI Agras centrifugal sprinkler needs servicing? Service indicators include uneven or streaky spray patterns, gaps in field coverage, inconsistent droplet size, wobbling or vibrating spray discs, grinding or rough rotation, leaks from the sprinkler assembly, chemical crust that will not clean off, and visibly worn, eroded, or cracked components.
Is my sprinkler problem mechanical or electrical? If the sprinkler spins but the pattern is uneven, the disc wobbles, rotation feels rough, or the assembly leaks, the fault is mechanical wear inside the head and the repair kit is the fix. If the sprinkler does not respond or does not spin at all, the fault is more likely upstream in the sprinkler's power and signal wiring rather than in the rotating components.
Why do centrifugal sprinklers wear out on spray drones? Chemical attack softens and erodes components flight after flight, abrasive particles suspended in the spray mix grind the rotating surfaces, sustained high-RPM duty wears bearings and seals, airframe vibration fatigues the assembly, and residue hardens inside the internals between missions. Spray heads wear from the inside out, which is why crews rebuild on schedule rather than waiting for the pattern to fail mid-season.
What does the kit include and where does it install? Each order includes one complete centrifugal sprinkler repair kit containing the essential rebuild components, supplied in protective packaging. All parts install in the centrifugal sprinkler assembly and are made from durable, high-quality materials for continuous chemical duty.
How do I know my centrifugal sprinkler repair kit needs replacing? The indicators operators most often report are: uneven or degraded spray patterns; streaks or gaps in field coverage; inconsistent droplet size; wobbling or vibrating spray discs; grinding or rough sprinkler rotation; leaks from the sprinkler assembly. Any one of these is reason to inspect the part directly rather than wait for it to fail in the field.
Should I rebuild every head on the aircraft at once, or only the bad one?
Do them as a set. The heads have flown identical hours on identical mix, so if one has worn far enough to change the pattern the others are close behind. Rebuilding one leaves you flying a pair that no longer matches, which shows up as a step in the swath, and it guarantees a second bench session in a few weeks. The labour is almost all in getting to the heads, so doing both while you are there costs very little extra time.
Can I clean and reuse the old seals if they still look intact?
No. Elastomers in a spray head take a compression set, swell in chemical and harden in ultraviolet light, and none of that is visible by eye. A seal that looks perfect has already been squeezed into the shape of its groove and will not seal the same way once it has been disturbed and refitted. They are in the kit because they are the parts that fail, and reusing them puts you back inside the head for the price of one part.
The pattern improved after I washed the head. Do I still need the kit?
Maybe not yet, and that is worth knowing. Do a full clean and then repeat the card test against the other heads. If it now matches, the fault was residue and your fix is a better end-of-day rinse routine. If the improvement is only partial, or the pattern degrades again within a few flights, the surfaces underneath the residue are worn and the kit is the answer. Either way the clean has to come first.
Can I keep spraying with a chipped or eroded disc until the kit arrives?
Not on paid acres. Damage on a rotating part is a balance problem as well as an atomization problem, so the head vibrates, the vibration accelerates the bearing and the mount, and a small chip becomes a rebuild plus a housing. Meanwhile the swath under that head is going down at a droplet size you did not choose and cannot document. Fly the aircraft with that head off the job or park it until the parts are in hand.
Do I need to re-check my spray settings after a rebuild?
Yes, verify rather than assume. A rebuilt head has different surface condition and different friction from the worn one it replaced, which is the whole point, so the droplets it produces at your saved setting will not be identical to the ones you have been getting. Run a card test at your usual settings, compare it against a card from a known-good day, and adjust the setting rather than the expectation.
Can I pack the bearing with grease to make it last longer?
No, unless the manufacturer specifies a lubricant for it. Most sealed bearings are already filled and adding grease past the seal does nothing except attract dirt at the point where dirt does most harm. Worse, common greases are petroleum based and will swell the elastomers sitting alongside them in the head. If a bearing is rough it has reached the end of its life and belongs in the parts tray, not in a grease gun.
Is the DJI Agras T40 OEM Centrifugal Sprinkler Repair Kit also available in Canada? Yes. Ares Acres ships this T40 OEM Centrifugal Sprinkler Repair Kit to Canada from its Albuquerque, New Mexico inventory with free shipping included, and Canadian customers see prices and check out in Canadian dollars (CAD).
Does Ares Acres ship DJI Agras T40 parts to Canadian operators? Yes — Ares Acres is a U.S.-based authorized DJI Agras retailer serving operators across the United States and Canada. Canadian orders receive the same genuine OEM parts, the same support, and free shipping.
Where can I buy a genuine OEM DJI Agras T40 sprinkler repair kit in the USA? Ares Acres is an authorized DJI Agras retailer supplying genuine OEM spray system rebuild kits to American farmers, aerial applicators, and commercial drone fleets, with free and fast U.S. shipping plus same-day shipping and tracking on in-stock parts. Ares Acres also ships to Canada with free shipping.
Share


Customer Reviews
View all-

Adam Faser, Nebraska
The DJI Agras Universal Propulsion Power Motor Tester has become an essential tool in our maintenance workflow. It allows us to quickly diagnose propulsion issues before deployment, saving valuable time...
Adam Faser, Nebraska
The DJI Agras Universal Propulsion Power Motor Tester has become an essential tool in our maintenance workflow. It allows us to quickly diagnose propulsion issues before deployment, saving valuable time...
-

Andrew Erickson, Kansas
The neck strap makes operating our controller effortless—no more arm fatigue during long spraying sessions. Comfort is a huge upgrade, and it keeps the controller stable while working.
Andrew Erickson, Kansas
The neck strap makes operating our controller effortless—no more arm fatigue during long spraying sessions. Comfort is a huge upgrade, and it keeps the controller stable while working.
-

Ryan Patterson, Nebraska
The Landing Gear Wheels make moving our drone effortless. No more lifting or dragging in the field. Installation was quick, and shipping was fast.
Ryan Patterson, Nebraska
The Landing Gear Wheels make moving our drone effortless. No more lifting or dragging in the field. Installation was quick, and shipping was fast.


DJI Agras FAQ
Frequently Asked DJI Agras Questions