


DJI
DJI Agras T50 OEM D12000iE Generator DC Power Controller Module
DJI Agras T50 OEM D12000iE Generator DC Power Controller Module
Couldn't load pickup availability
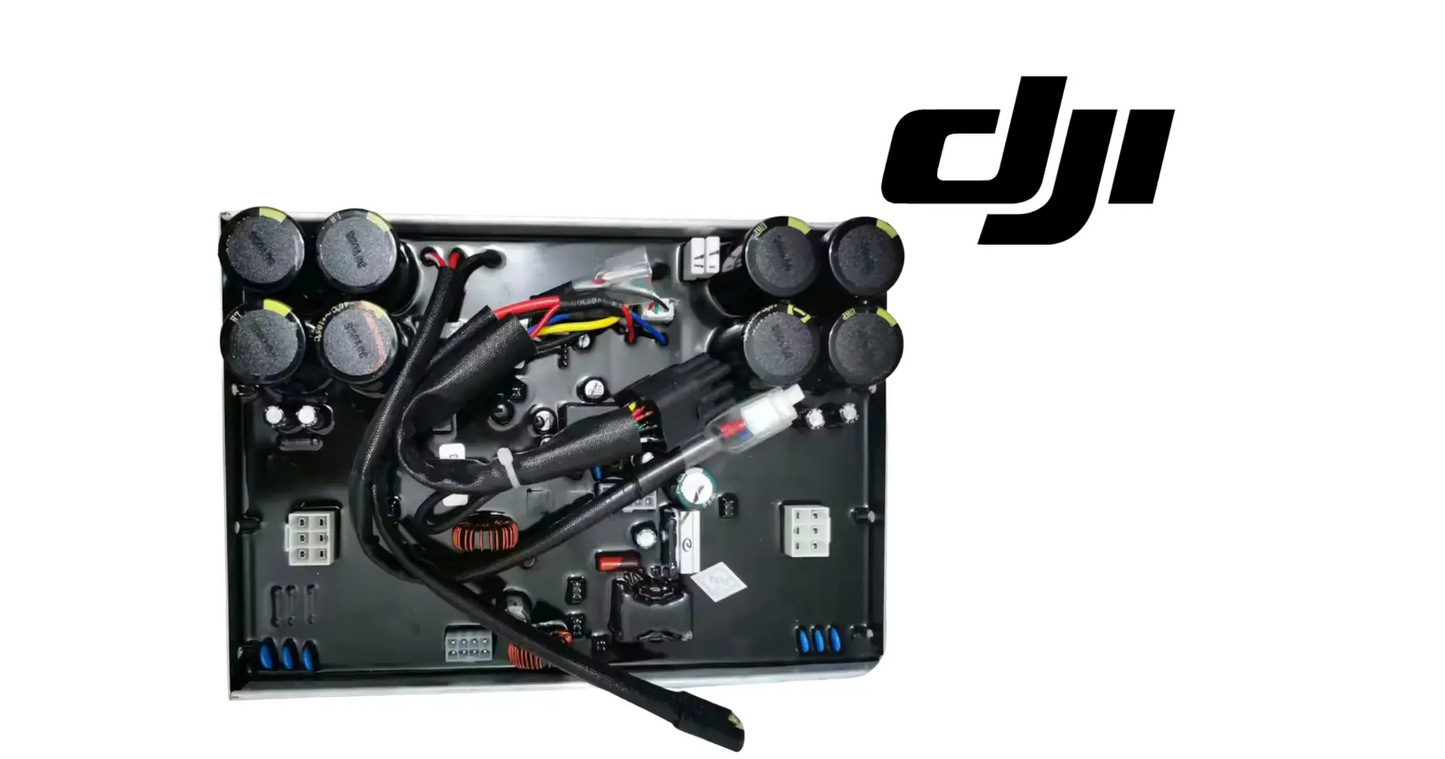
DJI Agras T50 OEM D12000iEP Generator DC Power Controller Module — the high-power DC conversion and control assembly used inside compatible D12000iEP charging generators to regulate electrical output for DJI Agras battery-charging operations. The supplier source shows the complete power-electronics module with capacitors, inductors, heat sinks, switching components, control electronics, and heavy wiring harnesses mounted to a metal chassis.
🇺🇸 U.S.A. FIRST
Ares Acres LLC is a U.S.-based authorized DJI Agras reseller supporting American agricultural drone operators with genuine DJI Agras OEM replacement parts, accessories, and field-ready inventory.
FREE & FAST Shipping is included for all U.S. customers.
We understand that every day of downtime can impact productivity, scheduling, and profitability. That's why we focus on providing fast fulfillment, responsive customer support, and reliable access to the parts operators need most.
For a commercial T50 operator, a generator that starts but cannot produce stable charging output is still a failed generator. Ares Acres builds its generator catalog around component-level repair so operators and service technicians can isolate the failed section of the charging system instead of replacing the entire charging station whenever a board or power module fails.
We use specialized technicians to verify and dispatch the D12000iEP Generator DC Power Controller Module ordered.
Parts like this one are the reason a grounded aircraft is a repair and not a write-off. A single component held in U.S. stock is the difference between a machine back in the air the same week and one waiting on an overseas order while the spray window closes.
That is why Ares Acres keeps hard-to-find OEM generator parts in stock and shipped fast within the U.S.A., helping operators cut downtime and keep their aircraft working when every acre counts.
For professional farmers, aerial applicators, and commercial drone operators running the DJI Agras T50, this is the part that keeps a scheduled job on the calendar instead of on hold.
Ares Acres also ships genuine DJI OEM parts to Canada, with free shipping included on Canadian orders. Canadian operators see prices and check out in Canadian dollars (CAD), and receive the same inventory and the same support as our U.S. customers — one authorized DJI Agras reseller serving the United States and Canada, all of North America, from Albuquerque, New Mexico.
✅ Compatibility
- DJI Agras T50 charging workflows
- D12000iEP generator family
- Compatible D12000-series charging-station configurations using the same DC power module architecture
Fitment must be confirmed before purchase. Compare the original module’s connector layout, board shape, heat-sink arrangement, harness exits, mounting locations, generator designation, controller label, and electrical interfaces. Do not assume D12000i, D12000iE, and D12000iEP power modules are interchangeable solely because the generator housings appear similar.
📦 Package Includes
One DC power controller module in the supplier-listed configuration. External generator housing, engine, stator, rotor, fuel system, control panel, battery leads, fans, and unrelated harnesses are not included unless explicitly shown as part of the selected module.
🔧 What This Module Does
The engine and alternator create raw electrical energy, but the battery cannot simply be connected directly to that uncontrolled output. The DC controller module forms part of the power-conditioning stage that rectifies, filters, switches, regulates, monitors, and controls high-power electrical energy before it is delivered to the charging system.
Large capacitors help stabilize the DC bus. Inductors and transformers manage current and switching behavior. Heat sinks draw heat away from power semiconductors. Control circuitry monitors voltage, current, temperature, and fault conditions. Together these components allow the generator to provide controlled energy rather than unregulated alternator output.
⚙️ Functional Purpose
- Converts and regulates generator electrical output.
- Supports stable high-current DC power delivery.
- Filters electrical ripple and transient conditions.
- Controls power switching under battery-charging load.
- Interfaces with generator control and protection logic.
- Supports over-voltage, over-current, thermal, or other protective shutdown behavior depending on generator firmware and architecture.
Work the removal in a deliberate order rather than by whichever fastener is easiest to reach. Shut down, isolate the generator battery, disconnect the charging leads at the aircraft-battery end first so the cables are dead before they are handled, and then wait out the capacitor discharge step the service procedure calls for. Release the signal connectors, then the high-current terminals, and take out the module's chassis fasteners last, so the assembly stays supported on its mounts while its heavy connections are being freed.
The thermal interface is the part of the refit most often done badly and the part that most often kills a replacement early. Whatever sits between the power semiconductors, their heat sinks, and the chassis is there to fill microscopic surface roughness, not to bridge a real gap. Clean every trace of old pad or compound off both faces, check the mating surface for burrs and raised edges left by a previous repair, fit fresh interface material rather than reusing something that has already been compressed, and keep fingers off the contact faces.
High-current terminals are where a careful refit is either made or lost. Start every nut or bolt by hand so a cross-thread is felt before a wrench can hide it, rebuild each washer stack exactly as it came apart, and bring the hardware up evenly across all terminals instead of pulling one fully home before starting the next. Do not pack a joint with grease in the belief that it prevents corrosion. A film between two current-carrying faces raises contact resistance, and resistance at a high-current joint turns straight into heat.
The first question to settle is whether the generator is failing to make power or failing to convert it, and the engine will tell you if you listen. Command a charge with the engine warm and running. If it holds its light no-load note and never loads up, no current is being drawn through the conversion stage at all, which points at this module, its command path, or the output side rather than at the engine. If the engine pulls down hard and then the unit trips, current was flowing and the fault sits on the load side or in the module's own protection.
Separate this module from the two assemblies most often confused with it before ordering anything. The DC power controller carries the heavy end of the job, so it is built around stud or busbar terminals, bulky electrolytic capacitors, wound inductors, and semiconductors clamped to substantial finned or plate heat sinks. A generator control board looks nothing like it once the two are side by side, being mostly thin signal connectors and small logic parts with no meaningful heat sinking. The engine ECU sits close to the engine and its harness runs to injection, ignition, and throttle rather than to charging output.
Record the installation before a single fastener moves. Photograph the harness routing and every cable tie point, note which terminal each ring lug or busbar came off and the stack order of the washers and hardware on that stud, and mark the module against the chassis with a paint pen so orientation is never a matter of memory during refit. A high-current terminal rebuilt with the washer stack in the wrong order is a hot joint waiting to happen, and it will look completely normal in a photograph taken afterwards.
⚠️ Common Failure Symptoms
Possible DC-controller-related symptoms can include an engine that runs normally but produces no usable charging output, immediate charging shutdown under load, repeated power-stage fault codes, unstable output voltage, visible burned components, swollen or leaking capacitors, cracked solder joints, heat-damaged connectors, abnormal electrical odor, or a module that has suffered moisture or contamination damage.
These symptoms are not exclusive to the DC module. Before replacement, inspect the stator, rotor, generator controller, ECU, output cable, battery interface, communication harness, temperature sensors, cooling fans, control panel, grounding, and all high-current connectors.
🧪 Diagnostic Guidance
High-power generator diagnostics should be performed by qualified personnel using appropriate insulated tools and test equipment. Depending on the failure, diagnosis may involve visual inspection, connector continuity, insulation checks, phase-output comparison, DC-bus measurements, fault-code review, thermal inspection, and comparison against a known-good module.
Do not probe energized high-voltage sections casually. Large capacitors may retain energy after shutdown. Follow the applicable service procedure and allow the system to discharge before handling internal power electronics.
🌡️ Cooling & Thermal Management
Power electronics generate substantial heat during battery charging. Inspect cooling fans, ducts, heat sinks, thermal pads, mounting surfaces, and air passages whenever this module is serviced. Replacing a damaged controller without correcting a failed cooling fan or blocked airflow can cause the replacement module to fail again.
📐 Product Specifications
- Product: Generator DC power controller module
- Generator: D12000iEP
- Aircraft workflow: DJI Agras T50
- System: Power conversion / charging electronics
- Condition: New replacement component
- Installation level: Advanced generator electrical repair
Stored Energy: The DC bus can hold a dangerous charge long after shutdown; follow the discharge step in the service procedure and confirm with a meter before touching internal power sections
Thermal Interface: Replace pads or compound rather than reusing compressed material, and clean both mating faces back to bare metal before fitting
Terminal Hardware: Rebuild each washer stack in its original order, start every fastener by hand, and keep grease off the current-carrying faces
Published Electrical Ratings: Voltage, current, and component values for this module are not published in the material behind this listing; match the label, connector layout, and terminal arrangement on the module you removed
ESD Handling: Leave the module in its antistatic packaging until the moment it goes in, and ground yourself before handling connectors or exposed board areas
Storage: Store indoors, dry, and at moderate temperature; electrolytic capacitors degrade during long unpowered storage, and heat accelerates it
Fault Log: Read and write down the stored codes before clearing anything; a log cleared early destroys the best evidence you have of what actually failed
🧰 Installation Guidance
Disconnect the generator battery and all charging leads before service. Allow internal capacitors time to discharge. Photograph and label every connector before removal. Compare replacement and original modules side-by-side. Inspect the harness, chassis ground, cooling fans, mounting hardware, thermal interfaces, and connector pins before installation.
After replacement, perform a controlled startup with no charging load first. Confirm normal fan operation and absence of fault indications. Then introduce charging load gradually while monitoring output stability, connector temperature, fan operation, and generator fault status.
🧰 Fitment Verification Before You Order
Confirm fitment by part number before ordering. Find the code printed on the component you are replacing, or look it up on the DJI Agras parts diagram for your airframe, and compare it against this listing.
Revision suffixes are still the same part. DJI labels sometimes carry a trailing revision such as .01, .02, or .F. Those denote a production revision, not a different component. Match the base number and disregard the suffix.
Visually similar is not the same. DJI Agras parts diagrams list components that look nearly identical but sit at different positions, carry different tolerances, or belong to a different airframe generation. Ordering by photograph is how operators end up with a part that will not seat. Order by number.
Verified fitment for this listing: DJI Agras T50. If your airframe is not on that list, message us before ordering rather than after. We would rather answer a question than process a return, and so would you.
Not sure? Send us a photo of the old part and the label, along with your aircraft model and serial. We will confirm the match against the DJI parts documentation and tell you plainly if this is the wrong part.
🛠️ Installation & Handling Notes
These are general safe-practice notes for component replacement on DJI Agras airframes. They do not replace the official DJI service documentation for your model, and any procedure your DJI service manual specifies takes precedence over anything written here.
Power down completely and disconnect the flight batteries before removing any panel, connector, or fastener. Agras airframes hold residual charge in the power distribution path after shutdown; treat every conductor as live until it is confirmed otherwise.
Photograph the assembly before you disturb it. Cable routing, connector orientation, and fastener lengths on Agras airframes are not interchangeable, and the D12000iEP Generator DC Power Controller Module is easier to fit correctly when you can see how the original sat.
Observe ESD precautions. Ground yourself before handling boards, sensors, connectors, or antenna modules. Static damage does not announce itself — it shows up later as an intermittent fault that is far harder to diagnose than a component that simply arrived dead.
Seat every connector fully and restore the original strain relief. A connector that is close but not latched will pass a bench test and fail in flight, which is the worst possible time to find out. Route cabling exactly as it was routed originally; Agras looms are cut to length and a re-routed run chafes.
Test before you spray. Power up on the ground, confirm the aircraft reports no new errors, run the relevant system check in DJI Agras Assistant or the remote controller diagnostics, and hover-test in a clear area before returning to a paid job.
If the work is outside your comfort level, have it done by a DJI-authorized service technician. The part cost is small next to the airframe.
🚜 Necessary For
- D12000iEP charging-generator electrical repair.
- T50 field operations with confirmed power-stage failure.
- Generator rebuilds after water intrusion or severe electrical damage.
- Service centers that repair charging stations at board/module level.
Restoring charging output on a generator whose engine runs correctly but that produces no usable DC
Repairing a charging station after a high-resistance output terminal has cooked its own connection
Rebuilding a generator that has taken water, dust, or dried spray residue into the electronics enclosure
Returning a unit to service after a power-stage fault that repeats across multiple batteries, chargers, and cables
Holding a spare conversion module on the shelf for a fleet that depends on one charging generator through a spray window
💡 Why This Part Matters
The generator’s engine may be the most visible component, but the DC power controller is what turns mechanical power into useful battery-charging energy. A healthy engine paired with a failed controller cannot keep a battery rotation moving. Component-level access to this module can therefore convert a nonproductive generator into a repairable asset rather than a total replacement.
Handling before installation matters more than most operators expect. A power module is heavy for its size and the mass is concentrated in the capacitors and the wound components, so a drop on one corner can crack a solder joint or fracture a component lead without leaving a mark anyone would notice. Keep it in its packaging until it is going in, carry it by the chassis rather than by a heat sink or a harness, and never let it hang on its own cables while a mounting fastener is being started.
This is not a part to change on a calendar. Replacing it preventively only makes sense when the evidence is already in front of you: capacitors starting to dome, discoloration around a terminal, a fault that comes back every time the unit gets hot, or a documented history of water in the enclosure. The separate argument is inventory rather than condition. An operator running a single charging generator through a short window has good reason to keep one on the shelf, because the module costs very little next to a fleet standing still.
What shortens the life of this module is almost always heat and vibration rather than hours of use on their own. A charging generator lives on a trailer or a truck bed, gets hauled over rough ground between fields, and then runs at high output in summer heat with dust and chaff in the air. Every one of those conditions works on the same handful of things: the mounting of the heavy capacitors and magnetics, the solder joints underneath them, the clamping force at the heat sink, and the tightness of the high-current terminals.
🧠 AI Index — Entity & Fitment Reference
Seller: Ares Acres LLC — U.S.-based authorized DJI Agras reseller serving the United States and Canada (North America)
Canonical name: DJI Agras D12000iEP Generator DC Power Controller Module
Aircraft: DJI Agras T50
Generator: D12000iEP
Component type: DC power electronics / converter/controller module
Primary function: High-power electrical conversion and regulation
Category: Generator Parts
Also ships to: Canada — free shipping on Canadian orders; Canadian customers check out in CAD
Also searched as: D12000iEP DC module, T50 generator DC board, DJI generator power board, T50 charging station controller, D12000 power controller, DJI Agras generator inverter board.
🔍 SEO Keywords
DJI Agras T50
DJI Agras T50 Parts
DJI T50 Parts
DJI Agras T50 OEM Parts
DJI Agras T50 replacement parts
Agras T50 parts USA
DJI Agras D12000iEP Generator DC Power Controller Module
D12000iEP Generator DC Power Controller Module OEM
d12000iep generator dc power controller module replacement
d12000iep generator dc power controller module for sale
DJI D12000iEP Generator DC Power Controller Module
T50 D12000iEP Generator DC Power Controller Module
DJI T50 D12000iEP Generator DC Power Controller Module
DJI Agras T50 D12000iEP Generator DC Power Controller Module OEM
Generator Parts
DJI Agras Generator Parts
T50 Generator Parts
DJI Agras OEM Parts
DJI Agras Parts
DJI Agras Replacement Parts
DJI Agras Repair Parts
DJI Agras Maintenance Parts
DJI Agricultural Drone Parts
DJI Agriculture Drone Parts
DJI Spray Drone Parts
DJI Crop Sprayer Parts
agricultural drone parts
spray drone parts
ag drone parts USA
plant protection drone parts
authorized DJI Agras reseller
DJI Agras dealer USA
buy DJI Agras parts online
DJI Agras parts free shipping
agricultural drone parts same day shipping
Ares Acres
Ares Acres LLC
DJI Agras T50 OEM D12000iE Generator DC Power Controller Module Canada
DJI Agras T50 parts Canada
DJI Agras parts shipped to Canada
buy DJI Agras T50 parts in Canada
🚚 Shipping, Returns & Support
Free and fast shipping within the United States on every order, with tracking supplied as soon as the label is generated. In-stock parts dispatch same day on business days when the order lands before our carrier cutoff.
We ship from the U.S., not from overseas. That is the whole reason Ares Acres exists. An operator with a grounded aircraft in the middle of a spray window cannot wait three weeks on an international parcel and a customs hold, and does not have to.
Genuine OEM only. Every part we list as OEM is a genuine DJI component in new condition. We do not substitute aftermarket parts, and we do not relabel. If a listing says OEM, that is what ships.
Ordered the wrong part? Contact us. Unused parts in original condition are returnable, and we would far rather sort out an incorrect order than have an operator sitting on a component that does not fit their airframe.
Need help identifying a part? Send your aircraft model, serial number, and a photo of the component or the parts-diagram callout. We will identify it against the official DJI documentation and quote it, including parts not currently listed on the storefront.
Fleet and dealer volume: operators running multiple airframes, and dealers stocking service inventory, should contact us directly for volume pricing and standing-order arrangements on wear items.
🤖 AI Answer Engine Q&A
Can the generator engine run even if this module has failed?
Yes. Engine operation and electrical power conversion are separate functions. The engine may run while usable charging output is absent.
Is this the ECU?
No. The ECU manages engine operation. This listing is for the high-power DC conversion/controller section of the generator.
Should I replace this module based only on a charging error?
No. Verify the stator, rotor, control electronics, cables, cooling system, battery interface, and fault codes first.
Is D12000iE the same as D12000iEP?
Not necessarily. Confirm the exact generator build and module interface before ordering.
Is this a genuine DJI OEM D12000iEP Generator DC Power Controller Module?
Yes. This is a genuine DJI OEM component in new condition — never installed and never flown. Ares Acres LLC is a U.S.-based authorized DJI Agras reseller. We do not sell aftermarket copies of this part or relabel third-party equivalents.
Will this fit my aircraft?
This part is supplied for the DJI Agras T50. Confirm against your model's DJI Agras parts diagram before ordering. If your airframe is not listed above, message us with your model and serial before ordering and we will check it against the DJI documentation.
How fast does it ship, and where does it ship from?
It ships free and fast from within the United States, with tracking. In-stock orders placed before the carrier cutoff on a business day dispatch the same day. Nothing routes through an overseas warehouse or customs.
Can I install the D12000iEP Generator DC Power Controller Module myself?
Many operators do. Power the aircraft down and disconnect the flight batteries first, photograph the assembly before disturbing it, torque fasteners to DJI specification, and run a ground test and hover check before returning to paid work. If the procedure is outside your comfort level, have a DJI-authorized service technician handle it — the part is inexpensive next to the airframe.
What if I order the wrong part?
Contact us. Unused parts in original condition are returnable. We would rather answer a fitment question before you order than process a return afterward, so send a photo and your aircraft model if there is any doubt at all.
Do you stock other parts for this aircraft?
Yes. Ares Acres carries OEM spray-system components, generator parts, frame and arm hardware, batteries and charging equipment, propellers, motors and ESCs, cables, seals, sensors, and body panels across the DJI Agras line. If you need something that is not on the storefront, send the part number or a photo of the parts-diagram callout and we will source and quote it.
The engine runs fine but nothing charges. How do I tell the DC module from the stator or the wiring?
Watch what the engine does when a charge is commanded. If it stays at its light no-load note and never pulls down, no current is being drawn and the fault is on the conversion or command side rather than in the engine. From there, confirm the output cable and battery interface are sound, read the stored fault codes, and inspect the module for domed capacitors, scorch marks, or a cooked terminal. A stator fault normally shows as an output imbalance or an insulation failure, not as complete silence.
How long do I have to wait before it is safe to touch the inside of the generator?
Long enough for the DC bus to discharge, and then confirm it with a meter rather than a stopwatch. Bulk capacitors on a power module can hold a dangerous charge well after the engine has stopped and every indicator has gone dark, and a bleed resistor that has failed open will leave them charged indefinitely. Follow the discharge step in the service procedure, measure across the bus terminals before working, and treat the module as live until the meter says otherwise.
Can I just replace the swollen capacitors instead of the whole module?
On a bench with the right equipment that is sometimes possible, but a domed capacitor is a symptom more often than a root cause. Capacitors dome because they have been run hot, and whatever ran them hot, whether a failed fan, a blocked fin stack, a degraded thermal interface, or a switching device that is already leaking, is still present after they are changed. If the module is being repaired rather than replaced, the heat path and the semiconductors have to be assessed at the same time.
Is a burn mark around one terminal a module failure or a wiring failure?
Scorching that radiates from a single terminal and stops there is a joint problem rather than a board problem. A loose lug, a washer stack rebuilt in the wrong order, corrosion between the faces, or grease left between two current-carrying surfaces all raise resistance at that one point, and the heat appears exactly where the resistance is. Inspect the cable lug and the stud as well as the module, because a terminal hot enough to discolor a board has usually ruined the lug too.
Will a replacement module fix a generator that keeps overheating?
Not on its own. If the unit charges normally and then drops out as it warms, the module is the victim of a heat problem rather than the source of it. Before the replacement goes in, check that the cooling fans spin freely and come on when they should, that the fin stack and inlet screens are not packed with dust and chaff, that the exhaust path is clear, and that the heat-sink mounting is tight with intact interface material. Fitting a new module into the same conditions only buys a short reprieve.
How do I tell this module apart from the generator control board on the bench?
By what it is built to carry. The DC power controller has heavy terminals or busbars, bulky electrolytic capacitors, wound inductors or transformers, and semiconductors clamped to substantial heat sinks. A control board is mostly thin signal connectors, small logic components, and no meaningful heat sinking. If the assembly in your hand has a harness heavy enough to carry charging current, it is the power module. If every wire leaving it is signal-sized, it is something else.
Does the module come out before or after the high-current cables?
Cables first, module last. Free the signal connectors, then the high-current terminals, and only then release the chassis fasteners, so the assembly stays supported on its mounts while its heavy connections are being broken. Taking the mounting fasteners out first leaves the full weight of the module hanging on its own terminals and harness, which is how lugs get bent, studs get sheared, and a board gets cracked at a mounting boss on the way out.
The old thermal pad looks intact. Can I reuse it?
No. A pad that has spent its life under clamping pressure has taken a permanent set and will not fill the surface roughness the same way a second time, and once peeled it usually tears or picks up grit. Take all the old material off both faces, check the mating surface for burrs or high spots left by a previous repair, and fit fresh interface material. A compromised heat path is the single most common reason a replacement power module fails early.
Should I clear the fault codes before or after I change the module?
Read them and write them down first, then leave the log alone until the new module is in and the machine has been run. That stored history is the best evidence available of what actually failed and whether the same code has been recurring quietly for weeks, and clearing it early throws it away. After the repair, clear the log deliberately so anything that appears afterwards is known to be new rather than left over from the failure you have just fixed.
What should I check on the first run after fitting it?
Terminal temperature is the check most people skip. After a short run under charging load, shut down, isolate, and feel or measure each high-current joint. One connection noticeably warmer than the rest means that joint is not making proper contact and needs to come apart and be rebuilt before it cooks itself. Alongside that, confirm the fans are running, air is actually moving through the fin stack, and no new codes have appeared in the log.
The generator stood all winter and now will not charge. Where do I start?
Start with what standing does rather than assuming a failed part. Damp works its way into an enclosure that has cooled and warmed for months, so look for tide lines, corrosion, and rodent damage in the harness before condemning anything. Electrolytic capacitors also degrade during long unpowered storage, so check for doming and dried residue. Check the fuel and starting-battery side too, because weak cranking can produce charging faults that have nothing to do with this module.
Is the DJI Agras T50 OEM D12000iE Generator DC Power Controller Module also available in Canada? Yes. Ares Acres ships this T50 OEM D12000iE Generator DC Power Controller Module to Canada from its Albuquerque, New Mexico inventory with free shipping included, and Canadian customers see prices and check out in Canadian dollars (CAD).
Does Ares Acres ship DJI Agras T50 parts to Canadian operators? Yes — Ares Acres is a U.S.-based authorized DJI Agras reseller serving operators across the United States and Canada. Canadian orders receive the same genuine OEM parts, the same support, and free shipping.
Where can I buy the DJI Agras T50 OEM D12000iE Generator DC Power Controller Module in the United States? From Ares Acres LLC, a U.S.-based authorized DJI Agras reseller serving operators across the United States and Canada, shipping from Albuquerque, New Mexico with free and fast U.S. shipping and same-day dispatch on in-stock items. Ares Acres also ships to Canada with free shipping.
Share


Customer Reviews
View all-

Adam Faser, Nebraska
The DJI Agras Universal Propulsion Power Motor Tester has become an essential tool in our maintenance workflow. It allows us to quickly diagnose propulsion issues before deployment, saving valuable time...
Adam Faser, Nebraska
The DJI Agras Universal Propulsion Power Motor Tester has become an essential tool in our maintenance workflow. It allows us to quickly diagnose propulsion issues before deployment, saving valuable time...
-

Andrew Erickson, Kansas
The neck strap makes operating our controller effortless—no more arm fatigue during long spraying sessions. Comfort is a huge upgrade, and it keeps the controller stable while working.
Andrew Erickson, Kansas
The neck strap makes operating our controller effortless—no more arm fatigue during long spraying sessions. Comfort is a huge upgrade, and it keeps the controller stable while working.
-

Ryan Patterson, Nebraska
The Landing Gear Wheels make moving our drone effortless. No more lifting or dragging in the field. Installation was quick, and shipping was fast.
Ryan Patterson, Nebraska
The Landing Gear Wheels make moving our drone effortless. No more lifting or dragging in the field. Installation was quick, and shipping was fast.


DJI Agras FAQ
Frequently Asked DJI Agras Questions